License
The UCX Hospitality application is a UCX licensed add-on that can be purchased from an authorized E-MetroTel reseller. Once you have purchsed the license with the required number of rooms you will need to update the license in the UCX software.
Retrieve the Hospitality (HP) License
- Open UCX Administration
- From the System tab, select Licenses
- From the left side column, select Enter License
- Click the Retrieve & Apply button.
- Verify that the Hospitality license code is now part of the Product Code shown on License Details page.
- The Hospitality license is indicated by the tag HP:n where n is the number of room licenses included.


Installation
Hospitality Software Package
Release 7.0
Once you have updated the license string, you will need to install the package in the UCX to begin configuring and using the functionality.
- Navigate to the Accessories page where you will see a list of all available Addon Packages
- Scroll to the entry for Hospitality Management Interface
- If the license has not been installed, there will be a Buy button presented which will connect you to the Partner Portal for ordering. You may also need to review the previous section on updating the license on the UCX.
- If the license is properly installed, click the INSTALL button.

- You may be prompted and required to update the UCX software prior to the install process, following the Software Update documentation. Once completed, the return to the Addon page and click the INSTALL button.
- The installation process will take a few moments, but you will receive progress indications from the browser.

- You will receive a final confirmation that the software was successfully installed.

- After the successful installation, the Hospitality tab will be added to the Accessories menu


Note that once you have installed Hospitality on Release 7.0, the Hospitality service will be included on the Process Status applet in the UCX Dashboard page allowing you to stop or restart the service as required during troubleshooting:

Release 6.0
From Release 6.0 and up, the ucx-hospitality package must be installed.
- From the System tab, select Updates
- From the left side column, select Packages
- Click on Show Filter under name field enter hosp
- Under Status pull-down, select All
- Locate the ucx-hospitality package and click on the Install link in the Status column

Connections
The E-MetroTel Hospitality Interface can communicate with most PMS systems using the Mitel or FIAS protocol, and with billing systems using the HOBIC interface.
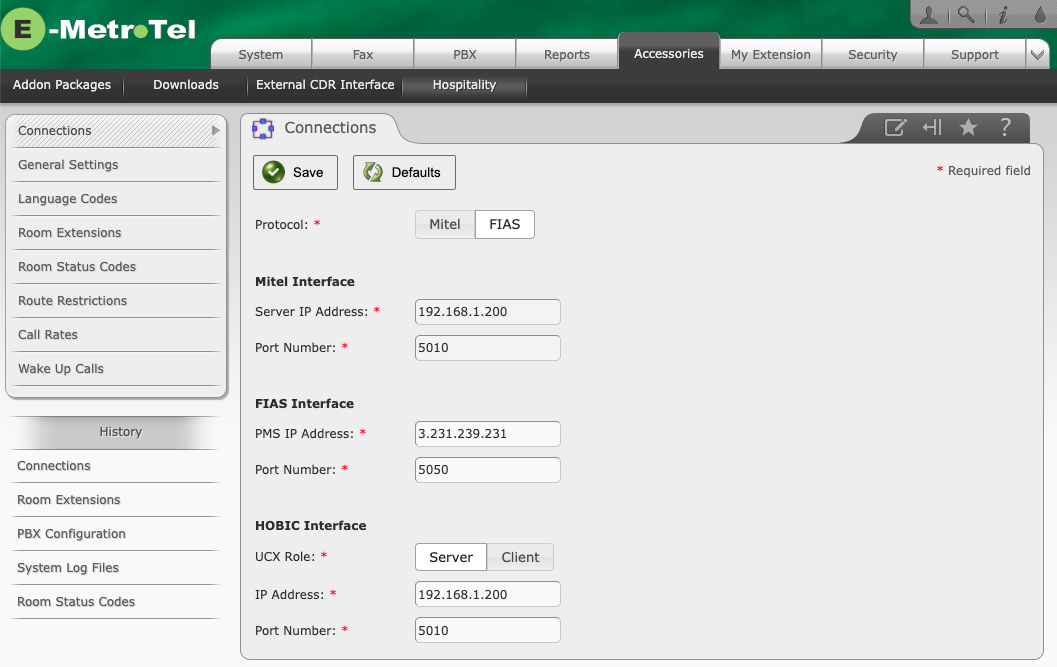
Note: Although IP address and port information can be entered in both the Mitel and FIAS configuration sections, only the interface type selected in the PMS Interface field above is used to determine the active connection parameters and protocol behavior.
Mitel Protocol (PMS)
The E-MetroTel UCX phone system emulates the Mitel SX-200 PMS protocol. It supports bidirectional half duplex messages using the ENQ/ACK/STX-text-EXT/ACK protocol sent over IP.
The UCX can operate as either the TCP server or client, depending on the requirements of the PMS platform integration.
To configure the Property Management System (PMS) connection parameters to use the Mitel protocol:
- Navigate to the Accessories / Hospitality page in Web-based Configuration Utility
- On the Protocol line, click on the Mitel button
- The PMS connection is configured under the Mitel Interface section
- The IP Address field requires the IP address of the UCX that will be communicating with the PMS application so the UCX will “listen” on that interface for messages.
- If the UCX has only one ethernet interface, you must use the default value.
- On a cloud system, this will be the internal address assigned to the UCX by the AWS system (as is assigned to Ethernet 0 on the System / Network page) and NOT the UCX public IP Address.
- The Port Number field must be configured with the port that the PMS system will use for connecting to the UCX.
Based on these two values, the UCX will monitor for an incoming connection request using the assigned Port Number on the UCX network interface associated with configured IP Address. Note that from a protocol perspective, this means that the UCX is operating in Server mode.
FIAS Protocol
The E-MetroTel UCX phone system supports FIAS protocol communications over TCP/IP for hospitality PMS integration.
The E-MetroTel UCX FIAS implementation has been validated for interoperability with Oracle Hospitality OPERA as well as INFOR PMS environments.
In FIAS environments, the PMS platform typically initiates the session establishment process. The UCX will respond using the configured FIAS connection parameters after communication is established by the PMS.
To configure the Property Management System (PMS) connection parameters to use the FIAS protocol:
- Navigate to the Accessories / Hospitality page in Web-based Configuration Utility
- On the Protocol line, click on the FIAS button
- The PMS connection is configured under the FIAS Interface section
- The IP Address field requires the IP address the FIAS system that will be communicating with the UCX Hospitality application.
- The Port Number field must be configured with the port that the PMS system will use for connecting to the UCX.
Billing Integration
The optional HOBIC interface can be used to support hospitality call accounting and guest billing integrations in Mitel hospitality protocol environments.
FIAS integrations provide native support for hospitality call posting and billing-related messaging functions. In Mitel hospitality protocol environments, optional HOBIC integration may be required to support call accounting or billing applications.
General Settings
This page is used to configure the dial plan information that are used for guest room dialing and reporting to the HOBIC system. Voicemail password options and Log File settings are also configurable.

General Settings Parameters
| Field | Description |
| Country Code | Enter the Country Code used to dial National calls (eg. 1 for North America) |
| Area Code | Enter the local Area Code associated with the outbound trunks used for guest dialing (eg. 214 for Texas Plano |
| International Prefix | Enter the International Prefix. These are the digits that guest would dial for making an outbound international call (eg. 011 for North American guests) |
| Dial Prefix Size | The number of digits that are dialed by guests to access an outbound trunk for calls. |
| Dial Prefix in HOBIC Records | Tells the UCX whether to Include the Dial Prefix string in the records sent to the HOBIC system or to Discard the Dial Prefix string from the records. Default = Discard |
| Voicemail Password | Indicate whether the guest voicemail password will be reset (Set to guest name) on new checkins, or if the password will remain the same (Do not change). Default = Set to guest name |
| Log Level | Indicate the level of information to capture in the hospitailty.log file accessible through the Support / System Log Files page. |
Notes about the Voicemail Password setting
- As soon as the UCX receives a Checkin command for a room from the PMS, the mailbox will be reset and the password will match the extension for that room.
- When the UCX receives a new Guest Name for a room from the PMS and the Voicemail password setting is Set to guest name, the password will be set to the digits matching the first four characters received in the assigned name as laid out on a telephone keypad. It is up to the PMS system to determine whether name order is first/last or last/first. Four characters are used regardless of the length of extension.
- On checkout, the password automatically is automatically matched to the room extension and the mailbox will be reset.
Language Codes
The PMS system is able to instruct the UCX to set the text and voice prompts on a Hospitality phone to use any of the languages defined on this page.
By default, the UCX is configured to support English, Spanish, and French prompts.

This interface allows you to either Add Language, Delete Language, or Edit the code mapping used for a specific language in case there is a mismatch between the PMS and the UCX Hospitality package
Room Extensions
The Hospitality Room Extensions page identifies which extensions on the UCX are to be considered guest Rooms.

Designate the Extensions
To designate the extensions as Guest extensions:
- Navigate to the Accessories / Hospitality page and select Room Extensions from the left panel.
- Click on Add Extensions

- In the Extension Numbers field enter the extensions that are defined on the UCX that correspond to the physical hospitaility rooms. The in the Room Numbers field enter the room numbers that will be used by the PMS system, then click Save.
 Note that ranges can be entered using the “-” sign and a comma as a delimiter between extensions and/or ranges, with no spaces between any entries.
 - Once you have saved, you will see all the UCX Hospitality Extension Numbers listed, as well as their corresponding PMS-associated Room Numbers.

- This same panel also showns if a room is currently Vacant from a PMS perspective, or, it will display the guest name as delivered by the PMS. (Refer to Hospitality – Guest Name Conversion for details on how the UCX handles accented characters.


Room Status Codes
The Room Status Codes page provides a mechanism to translate the feature codes recognized by the UCX Hospitality software to the code string that is required at the PMS system. The UCX Hospitailty feature does not define any specific meaning to the feature codes but will send the PMS Code that corresponds to the Feature Code directly to the PMS. The Room Status fiied is used for easy reference only. For instance, if the Housekeeping staff dial *1* from the guest room phone with extension 331, the UCX will send a message to the PMS indicating that room 3311 has sent a status event of 2 by default. However, the PMS code sent to the PMS in response to housekeeping any of the designated feature codes can be changed in this table.

Likewise, if the hotel wishes their staff to use a different set of feature codes when entering Room Status codes from the in-room telephone during housekeeping operations, the feature codes can easily be modified in the PBX / PBX Configuration / Basic – Feature Codes configuration page (refer to the Basic – Features Codes documentation).
Route Restrictions
You may enable or disallow access to any of the Outbound Routes that you have define on the UCX, and designate whether these routes should be used on for Emergency Class, Local Class, National Class, or International Class calls as designated. The PMS may send a restriction level specific to each guest when they check in.

Call Rates
The Call Rates page allows you to send rate information to the HOBIC system. You may edit or delete individual entries in this page, add additional call rates, delete all entries, and perform bulk changes in the Web-based Configuration Utility. You may also export the entire database as a VSC, Excel, or PDF file, and also upload as files.

Wake Up Calls
The Hospitality functionality includes the ability to monitor wake up call requests that are sent from the PMS, from UCX Administration or when configured directly from the room phone by dialing *68 on the DTMF keypad.
The time zone and current system time is always reflected in the upper right corner of the page.
Schedule a new (Wake Up) call
This page can be used to schedule wake up calls using the UCX Extension number and entering a time and date and then pressing the SCHEDULE button.
Viewing Scheduled Calls

The Scheduled Calls table shows the currently scheduled Wake Up calls queued on the UCX. Viewers of this page can press the Refresh Table button to update the table with all currently scheduled calls, or they may press the Delete button to remove an entry.
Configuration
For detailed explanation of the Configuration Parameters, refer to Wake Up Call documentation.
