Handset cannot receive calls
If the Extensions page shows the extension is registered but the handset cannot receive any calls, verify that the extension is assigned to the correct handset index.
Galaxy AP500D
- Navigate to the Extensions page.
- Click on the Extension.
- On the Edit extension page, under Select Handset(s) section, select the correct Idx and deselect others.
- Click Save.

Galaxy AP500M
- Navigate to the Extensions page.
- Click on the Extension.
- On the Edit extension page, for the Handset field, select the correct Handset Idx from the drop-down list.
- Click Save.

Extension not registered
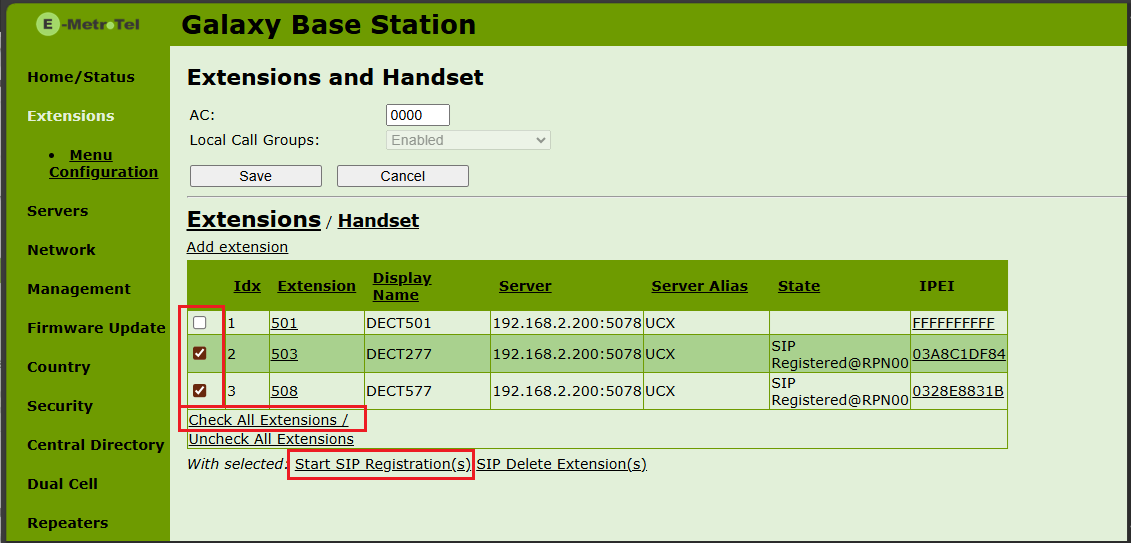
First verify that the correct Extension and Password (secret) is entered. Then follow the steps below to register the extension(s).
- From the Web Configuration Interface, go to Extensions page.
- Select the checkbox for the desired extensions or click on Check All Extensions
- Click on Start SIP Registration(s)
Handset not registered
If the handset fails to register:
- From the Web Configuration Interface, go to Extensions page.
- Click on Handset link.

- If the handset IPEI is listed then proceed to the next step. If it is not listed, click Add Handset and manually add it.
- Select the checkbox for the desired handset(s).
- Click on Register Handset(s)

Registration issues
- If the base is flashing red, means there are SIP registration errors. Check the SIP log on the DECT base and check the full log on UCX. If SIP registration requests are not reaching the UCX, check if firewall on the UCX is enabled. Disable the UCX firewall.
- If the SIP Extension has issues registering:
- Go to Security – IP Block List page on the UCX, check if the IP address has been blocked.
- Go to the Extension page on the UCX and check if NAT Mode is set to Yes.
- After successful registration, if the SIP Extension suddenly un-registers after a few minutes, go to the Extension page on the UCX and change the Qualify Frequency to a lower value, e.g. 40 (default is 60 seconds).
- If the extensions appears to be registered but unable to receive calls:
- Go to Network Settings page on the DECT Base Station, change Keep alive time to a lower value, should be less than the Firewall/NAT session timer.
- Go to PBX Configuration – SIP Settings page on the UCX, check if IP Configuration is set to Static IP.
Audio issues
- If using Cloud UCX, go to Network page on the DECT base, make sure Use Different SIP Ports is set to Enabled. Save and reboot.
- If on premise with UCX and DECT base in the same network, make sure Use Different SIP Ports is set to Disabled. Save and reboot.
Multi Cell
- Only the primary needs to be provisioned from the provisioning tool, the rest will auto-sync. Fill in the Primary MAC field.
- The primay base station and DECT chain will change on its own to optimize and reduce hops in the system.
- Once the system has been optimized and fully operational, delete the base station entry in the DECT Provisioning Tool on the Partner Portal.
- If handsets have call connection issues, verify that Multi-Zone is disabled for all the base stations. When disabling Multi-Zone, the base station has to be rebooted.
Coverage issues
Place the handset in Site Survey Mode and walk around the area checking if the reported signal strength is sufficient.
When the handset is in site survey mode, it will report the 5 strongest DECT base stations in vicinity (From left to right).
To place the handset into Site Survey mode:
- Start with the handset in IDLE mode
- Press the Menu key
- Enter *789872*

| Display Item | Description | Value |
|---|---|---|
| RPN | Radio Fixed Part Number The ID of the Base Station you are connected to in Hexadecimal (e.g., 04, 1A). | Ensure you are locking to the correct base. |
| RSSI | Received Signal Strength Indicator Signal strength in dBm. | QoS 1: -60 dBm or higher QoS 2: -70 dBm or higher See DECT – Traffic Planning and Deployment for details. |
| FE | Frame Errors. | Should be 0 or very close to it. High errors indicate interference. |
To exit site survey mode, repeat the code entry process above OR just power cycle the phone.
Stamp Log
If you need to create a timestamp log from a DECT handset, dial 9*9 followed by the green Off-hook button.
Note: Do NOT add # at the end of the string.
