Introduction
The handsets are lightweight, ergonomic, and portable, compatible with Wideband Audio (G.722), DECT, GAP standard and CAT-iq audio compliant. E-MetroTel’s handsets include a color display with graphical user interface and can provide the user with most of the features available in a wired phone. In addition to this, they support roaming and handover capabilities.
There are 2 models of handsets offered.
- Infinity 577 is a ruggedized handset with Bluetooth intended for office use.
- Infinity 277 is an entry level handset intended for any work environment.
 |  |
The main differences between the handsets can be seen in the table below.
| DESCRIPTION | INFINITY 277 | INFINITY 577 |
|---|---|---|
| Display | 2″ TFT, 176×220 | 2’’ TFT, 240×320 |
| Size (mm) | 128 x 48 x 21 | 118 x 46 x 21 |
| Weight (including batteries) | 110g | 86g |
| Talk time | 22H(NB), 14H(WB) | 17h(NB), 12h(WB) |
| Battery | 1100 mAh Li-ion | |
| Alarm Key | No | Yes |
| Bluetooth | No | Yes |
| 3.5 mm wired headset jack | No | Yes |
| Other | 4 extra programmable keys |
Packing List
Infinity 277
- 1x Handset unit
- 1x Battery cover
- 1x Handset belt clip
- 1x Charger
- 1x A/C adaptor
- 1x Battery
- 1x Plastic cover to replace the belt clip
Infinity 577
- 1x Handset unit
- 1x Battery cover
- 1x Handset belt clip
- 1x Charger
- 1x A/C adaptor
- 1x Battery
Hardware Characteristics
There are some minor hardware differences between the devices, even though all handsets have a similar design. The following list presents an overview of Infinity 577 handset, which includes all the main hardware features for the handsets.
 | 1 | Earpiece Speaker | |
|---|---|---|---|
| 2 | Screen | ||
| 3 | Navigation keys | Up/Down/Right/Left | |
| 4 | Selection key | Confirm or select an option. | |
| 5 | Off-hook key | Answer a call. Use as a shortcut to the Call list. | |
| 6 | On-hook key | End a call. Return to the previous menu. Switch the handset on/off by long press. | |
| 7 | Menu Key | Enter the main menu of the handset. | |
| 8 | Speaker Key | Enable/Disable speaker mode during a call. NOTE: If enabled during a call, the speaker key will light up in red and the sound will come from the speaker on the back of the handset. | |
| 9 | Softkeys | Used for different commands in the various menus of the handset, which change according to what is displayed on the screen. | |
| 10 | LED | Indicates missed call (red flashing), messaging (green flashing), low battery (double flash). On the Infinity 277, the LED is a small dot beside the Earpiece Speaker (1). |
  | 11 | Headset connector (3.5mm) | Slot used for connecting a headset. The connector is protected against dust by the headset connector cover. Supported only with Infinity 577. |
|---|---|---|---|
| 12 | Volume Up Key (Side Key) | Increase the volume during a call. Supported only with Infinity 577. | |
| 13 | Volume Down Key (Side Key) | Decrease the volume during a call. NOTE: The volume buttons are used to control the volume when using the earpiece, a headset, and the loudspeaker. The lowest volume level will not mute the handset. Supported only with Infinity 577. | |
| 14 | Mute Key (Side Key) / Push-to-talk (PTT) key | Turn Off/On the microphone during a call. If the handset is in idle and the button is pressed, it will activate the PTT function. Supported only with Infinity 577. | |
| 15 | External Speaker | Used when speaker mode is enabled in a call. | |
| 16 | Battery | ||
| 17 | Alarm Key | Speed dial to a number configured in the base station. Hold for 3 seconds to dial. Supported only with Infinity 577. |
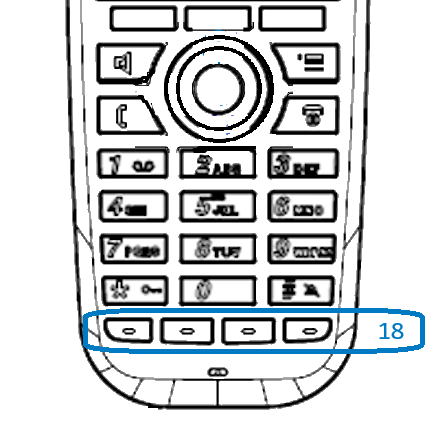 | 18 | Function keys | Supported only with Infinity 277. |
|---|
Keypad
The image below illustrates the available characters on the handset’s keypad. Depending on the selected menu language, other characters can be available. Therefore, the character order can differ from the one below.

Number input mode
When in idle, a short key press enters the digits “0” – “9” and the characters “*” and “#”.
A long key press on “0” generates a “+”.
Text input mode
When writing a text, a short press on keys “0” – “9” displays the first available character on that specific key. By pressing the “*” key it is possible to change the letter input to upper/lower case or only a numeric value (Abc, abc, ABC, or 123).
Use the “0” key to add a space in the text.
Key Features
Power On and Off
Long press the red On-hook key to power ON/OFF the handset.
Key lock
The keypad can be locked/unlocked by long pressing the “*” key in idle. This feature can prevent accidentally pressing keys and making a call.
NOTE: It is possible to answer/reject an incoming call while the keypad is locked
Silent mode
The silent mode feature can be activated/deactivated by long pressing the “#” key in idle. When enabled, the handset will turn to silent mode and a “Sound Off” icon will be displayed in the status bar.
NOTE: When this mode is enabled, it is possible to switch on/off the vibrator on the handset in Settings > Audio Settings > Vibrator. Please note, that all other audio settings will be greyed out while the handset is in silent mode.
Speed Dial Key
Any key from “2” – “9” can be set as a speed dial key – a shortcut to calling any contact in the contact list, or in the F-Key list. A long press on any of these keys, while the handset is in idle, will call the assigned contact.
IP Search
The handset has an “IP search” feature, which allows the user to scan for bases in range of the handset.
- Start with the handset in IDLE mode
- Press the Menu key
- Enter *47*
The handset will now enter scanning mode and listen for signals from the nearest base stations. Depending on the number of bases and the distance to them, it can take up to a few minutes.
As soon as a base is found, the handset will display the MAC address of the base, together with its IP address.
Use the navigation keys on the handset to scroll up and down the list and select a base from the list. It will then show additional information like RSSI value that you can use to check for signal strength and coverage.

Site Survey Mode
When the handset is in site survey mode, it will report the 5 strongest DECT base stations in vicinity (From left to right).
To place the handset into Site Survey mode:
- Start with the handset in IDLE mode
- Press the Menu key
- Enter *789872*

| Display Item | Description | Value |
|---|---|---|
| RPN | Radio Fixed Part Number The ID of the Base Station you are connected to in Hexadecimal (e.g., 04, 1A). | Ensure you are locking to the correct base. |
| RSSI | Received Signal Strength Indicator Signal strength in dBm. | QoS 1: -60 dBm or higher QoS 2: -70 dBm or higher See DECT – Traffic Planning and Deployment for details. |
| FE | Frame Errors. | Should be 0 or very close to it. High errors indicate interference. |
To exit site survey mode, repeat the code entry process above OR just power cycle the phone.
Device Installation
Handset battery
The handsets use Li-ion 3.7V 1100mAH 4.1Wh batteries to operate. Please, be aware of the following:
- Never dispose a battery in fire, otherwise it will explode. Instead, it must be delivered to a recycling company.
- Never replace the batteries in potentially explosive environments, e.g., close to inflammable liquids/gases.
- ONLY use approved batteries and chargers from the vendor or operator.
- Do not disassemble, customize, or short circuit the battery.
Handset charger
Each handset is charged using a handset charger. The charger is a compact desktop unit, designed to charge and automatically maintain the correct battery charge levels and voltage. The handset charger is powered by AC supply from 110-240VAC that supplies 5.5VDC at 600mA.
Each handset comes with a battery which is already placed in the device. Important: you need to activate the battery by removing the plastic foil. To access the battery slot, you first need to open the back cover. Depending on the handset type, the back cover can be opened in different ways (see images below). Afterwards, you need to remove the battery followed by the plastic foil. Do not pull the plastic foil out without removing the battery, this might damage the charging pins. After that you can put the battery and the cover back in place and charge your handset.

On the battery slot of each handset, you can find a label with the serial number (S/N) and IPEI/IPUI number of the device. This information can be also seen on the packaging label of the handsets.
When charging the battery for the first time, it is necessary to leave the handset in the charger for at least 10 hours before the battery is fully charged, and the handset is ready to be used.
For correct charging, ensure that the room temperature is between 0°C and 25°C / 32°F and 77°F. Do not place the handset in direct sunlight. The battery has a built-in heat sensor which will cause the battery to stop charging if its temperature is too high.
If the handset is powered off when placed in the charger, the handset will turn on and display (shortly) the charging message “Charger connected”. After a while, the display backlight will dim and then turn off. The handset will still be available for incoming calls, messages, etc.
If the handset is turned on when placed in the charger, the display will show (shortly) the charging message “Charger connected”. After a while, the display backlight will first dim and then turn off, unless “Idle Screen Saver” is enabled.
Accessing the Device
To get access to the handset, simply insert the battery and power on the device by long pressing the On-hook button. The display will light up and the handset will be ready for use.
