This section describes the steps required to create a fully functional analog trunk or trunk group for the UCX using the GUI interface on both the UCX and an FXO8 Analog Gateway card with an available FXO Port.
Prerequisites
Gateway Card
- The FXO8 Gateway card must be on a network interface that is able to be routed to the UCX software
- The FXO8 Gateway card must be activated with the E-MetroTel Serial Management tool.
- The FXO8 Gateway card must have one or more unassigned FXO ports available, or you must edit an existing port configuration.
UCX
- The UCX must be configured with Outbound Routes that will select the SIP Trunk that is associated with the FXO port on the Gateway card.
Overview
Configuring FXO based Analog Trunk(s)
There are two possible deployment scenarios for FXO trunks that require slightly different configurations on FXO8 Gateway cards:
- A single FXO port or a single group of FXO ports on the same card will act collectively as the only trunk group connected to a particular UCX.
- Multiple FXO ports or groups of FXO ports on the same card will act as separate trunk groups connected to the same UCX.
Note that each of these two scenarios do not preclude the use of one or more FXO ports being connected to a second UCX; the same basic configuration rules will apply.
Scenario One – Single Trunk or Trunk Group
An example of this scenario would be a group of four FXO ports that are pooled together for placing inbound or outbound calls. Calls from the PSTN or far-end are answered by an FXO port which are then presented to the UCX
Scenario One – On the FXO8 card
Step 1 – Create a Profile
Create a Profile for communication to the target UCX.
To create a Profile on the FXO interface, navigate to the Profiles menu on the FXO8 menu. If no existing Profile to the target UCX exists, select a previously un-configured profile (for example, Profile 1)
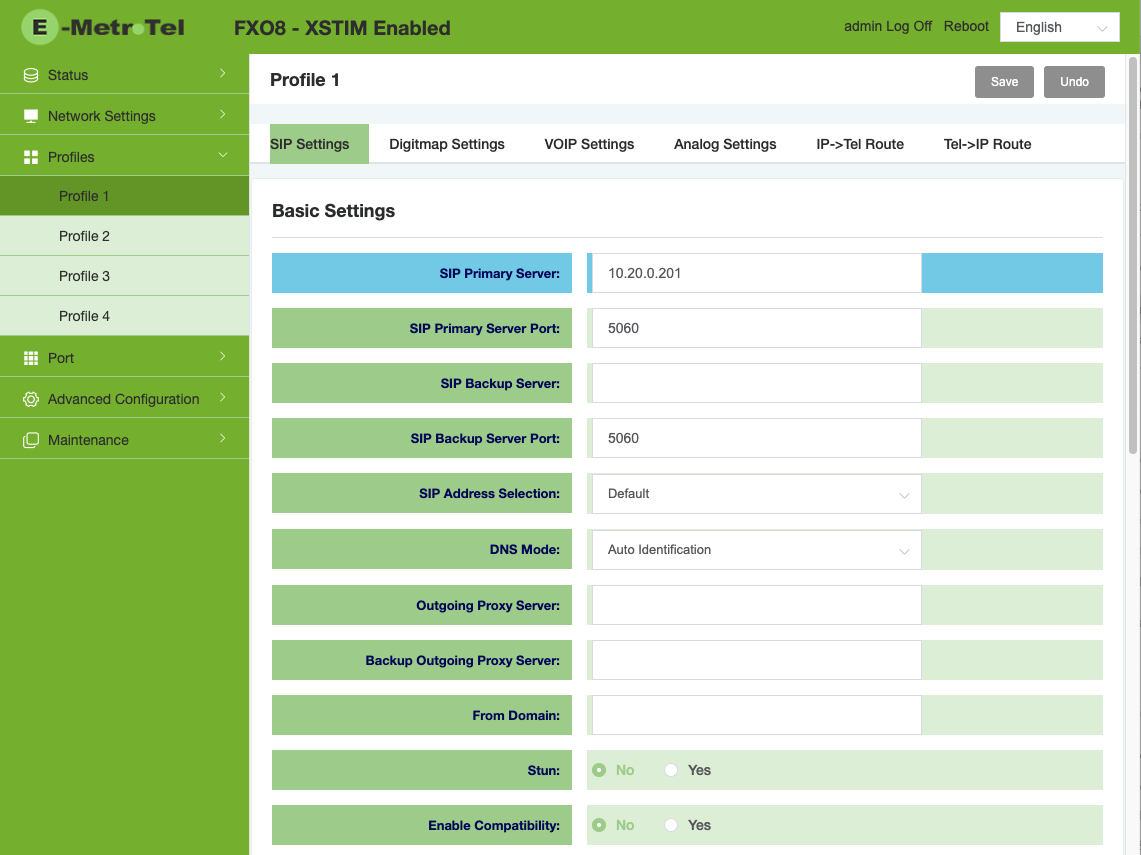
In the SIP Settings tab:
- SIP Primary Server: Enter the IP Address of the target UCX (ex. 10.20.0.201)
- SIP Primary Server Port: Enter the SIP signaling port used by the UCX. (ex. 5060)
- Enable Compatibility: This should be set to No (default)
- All other fields can remain at defaults.
- Click Save

In the Digitmap Settings tab:
- Dialing Rules: Enter x. (lower case x followed by a period)
- All other fields can remain at defaults.
- Click Save


Step 2 – Configure Port Settings
Configure the Port Settings associated with the physical FXO ports.
Navigate to the Port / Port Settings tab
- Observe if any existing Groups are configured, and take note of their Group Number
- Click Add
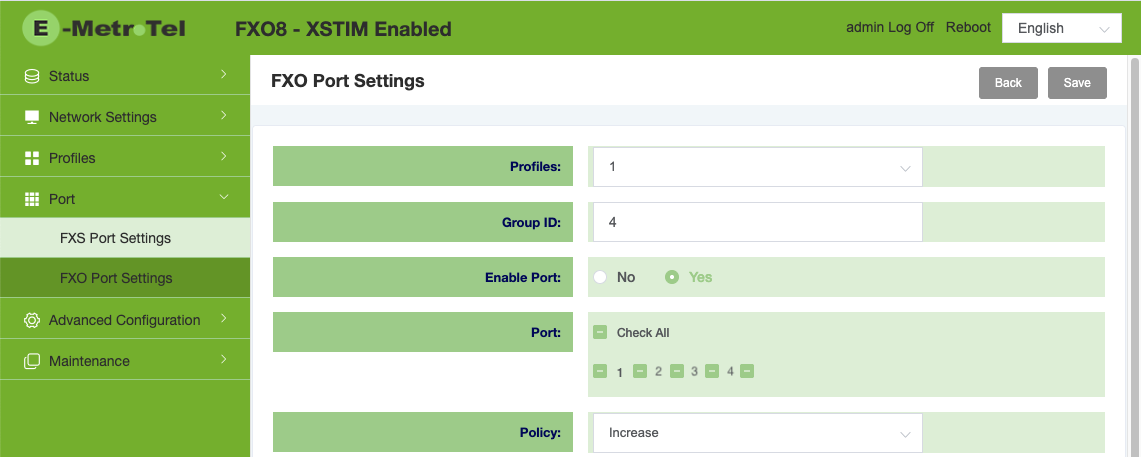
- Select the Profile number associated with the target UCX created in the first step (i.e select “1”)
- Create a Group ID by selecting a number between 4 and 32 which requires not re-using the existing group number(s) identified above.
- Set Enable Port to Yes
- In the Port field select the physical FXO Port or Ports you want to use in the trunk group (in the example the four ports 1 through 4 are selected)
- If more than one FXO Port is selected in the previous step, select the Policy to be used when selecting which Port should be used for new calls initiated by te UCX over the corresponding SIP trunk.
- Increase – Always search upward beginning with the lowest numbered port and select the first idle port
- Decrease – Always search downward beginning with the highest numbered port and select the first idle port
- Cyclic Increase – Always search upward and select the next idle port after the last one previously selected
- Cyclic Decrease – Always search downward and select the next idle port after the last one previously selected
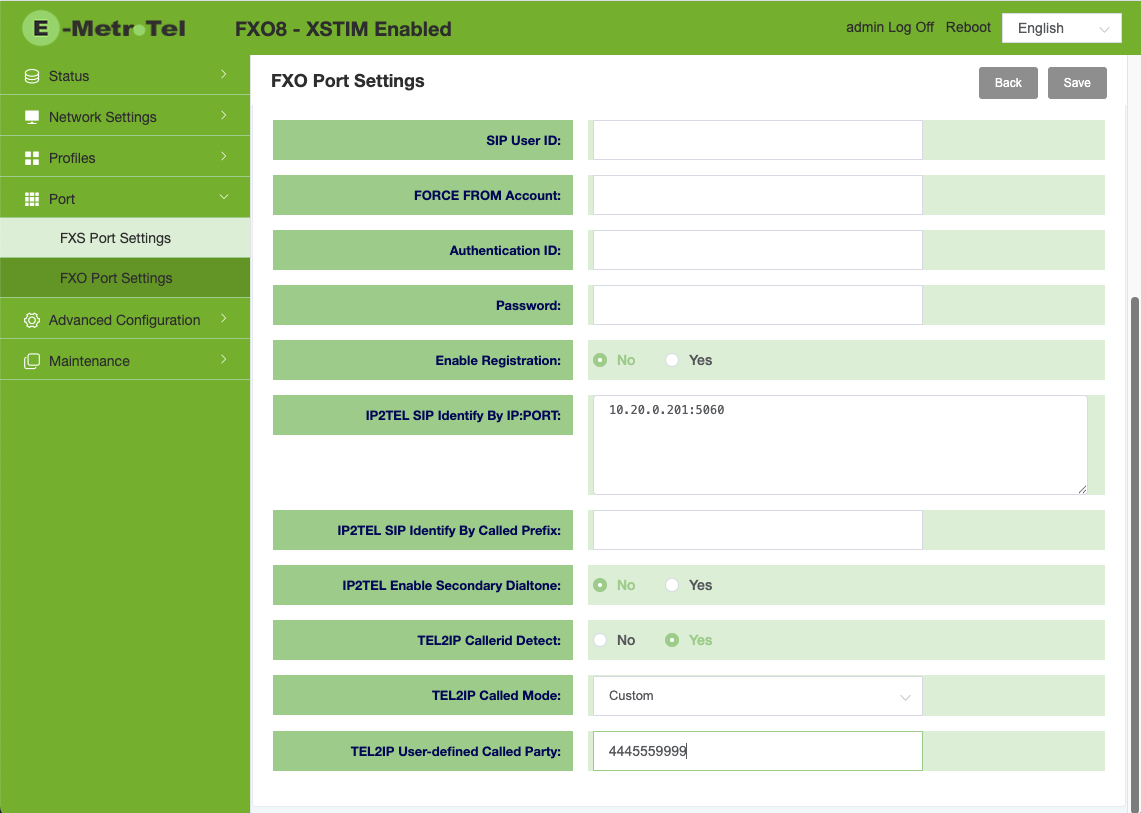
- SIP User ID, FORCE FROM Account, Authentication ID, and Password fields should all be left blank.
- Enable Registration must be set to No.
- IP2TEL SIP Identify By IP:PORT: must be set to the IP Address and SIP Port Number of the UCX, separated by a colon (i.e. 10.20.0.201:5060 in our example). This will associate any incoming SIP calls from this UCX and port number with the physical ports you identified in item 6, above.
- IP2TEL SIP Identify By Called Prefix: can be left as No.
- IP2TEL Enable Secondary Dialtone must be set to No to allow the card to pass the dialed number from the UCX to the FXO port to be sent out as DTMF digits.
- TEL2IP Callerid Detect should be set to yes to allow CallerID to pass through to the UCX.
- The TEL2IP Called Mode setting should be set to Custom to allow the FXO card to send a user-defined Called Party string (set in the next step) in SIP messages to the UCX which will then be identified as the DID digits for incoming calls. Other settings for this field include Group Number and Port Number. These settings will will cause the FXO port to send the corresponding Group Number or Port number as the Called party information.
- Once the TEL2IP Called Mode is set to Custom, then the TEL2IP User-defined Called Party can be set to any string to be sent to the UCX as the Called Party digits, or DID for an incoming call (i.e. 4445559999 in the example).
- Click Save

Verify the information provided in the entry displayed in the FXO Port Settings table when it is updated, taking note of the SIP Signaling Port identified for this new entry, as this will be required when creating the UCX SIP trunk (port 30008 in our example).

Scenario One – On the UCX
Step 1 – Create a SIP Trunk
On the UCX, navigate to the PBX / IP Trunk Assistant page.
- In the Account Settings section:
- In the Account Name field, enter a name for the trunk (eg. FXOCombo204)
- In the Trunk Provider drop-down menu, select E-MetroTel FXO Gateway
- Leave the Outbound CallerID Number and the Outbound CallerID Name fields blank
- In the Configuration Details section
- In the Host / IP field, enter the IP Address o f the FXO8 card
- Leave all other settings as defaults, make sure to use the IP Address and Port number of the FXO8 card noted in the previous step using the format ipaddress:portnumber (i.e. 10.20.0.204:30008).


Step 2 – Create an Outbound Route
Refer to Outbound Routes for full details on how to set up outbound routes to select the SIP trunk configured in the previous step (FXOCombo204 in the example above). No prefix digits are required in the Dial Patterns that will use this Route field(s).
Scenario Two: Multiple independent Trunks or Trunk Groups
In this scenario, more than one trunk or trunk group is connected between the Analog Gateway card and the UCX to enable inbound calls to be associated with a specific DID or outbound calls to be sent over a specific physical trunk or group of trunks. For calling from the UCX to the FXO8 card, this scenario requires a unique set of prefix digits for each trunk or group of trunk ports to be used. The digits will be sent by the UCX so that the FXO8 card can determine which trunk group the call from the UCX is targeting. Once this is determined, the FXO8 card will strip the digits prior to sending the DTMF on the analog interface.
Scenario Two – On the FXO8 card
Step 1 – Create a Profile
Create a Profile for communication to the target UCX.
To create a Profile on the FXO interface, navigate to the Profiles menu on the FXO8 menu. If no existing Profile to the target UCX exists, select a previously un-configured profile (for example, Profile 1)
In the SIP Settings tab:
- SIP Primary Server: Enter the IP Address of the target UCX (ex. 10.20.0.201)
- SIP Primary Server Port: Enter the SIP signaling port used by the UCX. (ex. 5060)
- Enable Compatibility: This should be set to Yes. (This setting is required to enable the use of the Inbound Identify By Called Prefix setting in the FXO Port Settings section below.)
- All other fields can remain at defaults.
- Click Save

In the Digitmap Settings tab:
- Dialing Rules: Enter x. (lower case x followed by a period)
- All other fields can remain at defaults.
- Click Save
Step 2 – Configure Port Settings – First Port
Configure the Port Settings associated with the first FXO port or ports.
Navigate to the Port / Port Settings tab
- Observe if any existing Groups are configured, and take note of their Group Number
- Click Add
- Select the Profile number associated with the target UCX created in the first step (i.e select “1”)
- Create a Group ID by selecting a number between 4 and 32 which requires not re-using the existing group number(s) identified above.
- Set Enable Port to Yes
- In the Port field select the physical FXO Port or Ports you want to use in the trunk group (in the example the four ports 1 and 2 are selected)
- If more than one FXO Port is selected in the previous step, select the Policy to be used when selecting which Port should be used for new calls initiated by te UCX over the corresponding SIP trunk.
- Increase – Always search upward beginning with the lowest numbered port and select the first idle port
- Decrease – Always search downward beginning with the highest numbered port and select the first idle port
- Cyclic Increase – Always search upward and select the next idle port after the last one previously selected
- Cyclic Decrease – Always search downward and select the next idle port after the last one previously selected
- SIP User ID, FORCE FROM Account, Authentication ID, and Password fields should all be left blank.
- Enable Registration must be set to No.
- Inbound Identify By IP:PORT: must be empty
- Inbound Identify By Called Prefix: must be set to an arbitrary digit string unique to this trunk or trunk group (701 in this example). This will also be input as a prefix string on the UCX Outbound Route settings.
- IP2TEL Dialed Called Number is not required
- The TEL2IP Called Mode should be set to Custom
- The TEL2IP User-defined Called Party should be set to a set of unique digits that can be used on the Inbound Route for this trunk group on the UCX (eg. the actual PSTN DID number.)
- Click Save


- Verify the information provided in the entry displayed in the FXO Port Settings table when it is updated, taking note of the SIP Signaling Port identified for this new entry, as this will be required when creating the UCX SIP trunk for this trunk group (port 30008 in our example).


Step 3 – Configure Port Settings – Additional Ports
Configure the Port Settings associated with each additional FXO port or group of ports.
Navigate to the Port / Port Settings tab
- Observe if any existing Groups are configured, and take note of their Group Number
- Click Add
- Select the Profile number associated with the target UCX created in the first step (i.e select “1”)
- Create a Group ID by selecting a number between 5 and 32, i.e not re-using the existing group number(s) identified above.
- Set Enable Port to Yes
- In the Port field select the physical FXO Port or Ports you want to use in the trunk group (in the example the four ports 7 through 8 are selected)
- If more than one FXO Port is selected in the previous step, select the Policy to be used when selecting which Port should be used for new calls initiated by te UCX over the corresponding SIP trunk.
- Increase – Always search upward beginning with the lowest numbered port and select the first idle port
- Decrease – Always search downward beginning with the highest numbered port and select the first idle port
- Cyclic Increase – Always search upward and select the next idle port after the last one previously selected
- Cyclic Decrease – Always search downward and select the next idle port after the last one previously selected
- SIP User ID, FORCE FROM Account, Authentication ID, and Password fields should all be left blank.
- Enable Registration must be set to No.
- Inbound Identify By IP:PORT: must be empty
- Inbound Identify By Called Prefix: must be set to an arbitrary digit string unique to this trunk or trunk group (702 in this example). This will also be input as a prefix string on the UCX Outbound Route settings.
- IP2TEL Dialed Called Number is not required
- The TEL2IP Called Mode should be set to Custom
- The TEL2IP User-defined Called Party should be set to a set of unique digits that can be used on the Inbound Route for this trunk group on the UCX (eg. the actual PSTN DID number.)
- Click Save


- Verify the information provided in the entry displayed in the FXO Port Settings table when it is updated, taking note of the SIP Signaling Port identified for this new entry, as this will be required when creating the UCX SIP trunk for these trunks group (ports 30008 and 30009 in our example).


Step 4 – Add IP->Tel Route settings
Add IP->Tel Route settings for each trunk group in the SIP Profile.
In the previous step the FXO ports were configured to use Profile 1. Now Profile 1 needs to be configured to strip the extra digits that will be added as prepend digits on each of the UCX Outbound Routes created in the next steps on the UCX.
In the Profile 1 page on the FXO8 menu:
- Navigate to the IP->Tel tab of the Profile 1 page
- Click the Add button

- In the Matches Callee Prefix, add the digits 701 (or someother unique string that wil also be configured on the UCX Outboud Route for this trunk)
- In the Routing Action select Accept from the dropdown menu
- In the Delete Callee Prefix enter the number of prefix digits that should be deleted before sending to the far end of the analog circuit.

- Click Save
- Click Add to create another IP->Tel configuration for each additional trunk group.
- Configure those same parameters to match the prepend digits that will be used on the second trunk group (in this case using 702)

- Click Save
- Verify that there is an entry corresponding to each trunk group you are establishing


Scenario Two – On the UCX
Step 1 – Create SIP Trunks
Create SIP Trunks for each of the trunk groups configured on the FXO8 card.
On the UCX, navigate to the PBX / IP Trunk Assistant page and click New Account (you will need a new account for each of the trunk groups)
- In the Account Settings section:
- In the Account Name field, enter a name for the trunk (eg. FXOCombo204)
- In the Trunk Provider drop-down menu, select E-MetroTel FXO Gateway
- Leave the Outbound CallerID Number and the Outbound CallerID Name fields blank
- In the Configuration Details section
- In the Host / IP field, enter the IP Address of the FXO8 card and the port number of the associated trunk group on the FXO8 noted in the previous step using the format ipaddress:portnumber (i.e. 10.20.0.204:30008)
- Leave all other settings as defaults

- Click Save
- Create additional IP Trunks for each additional trunk group on the FXO8 card.


Step 2 – Create Outbound Route
Create an Outbound Route for each trunk group.
Refer to Outbound Routes for full details on how to set up outbound route(s) to select the SIP trunks configured in the previous step (FXOS8Group1 and FXOS8Group2 in the this example). In this case, multiple Outbound Routes will be required – one for each of the trunk groups configured on the FXO8 card.
Each Outbound Route will require the prefix digits configured on the trunk group settings on the FXO8 in the above steps to be used in each entry of the Dial Patterns that will use this Route field(s). Note that these prefix digits will be inserted by the UCX but then stripped by the FXO8 card before sending the dialed digits to the analog network interface for dialing.
The following examples would cause all 11 digit calls to area code 403 to be routed to the first trunk group using the FXOS8Group1 SIP Trunk, and all 11 digit calls to area code 780 to be routed to the second trunk group using the FXOS8Group2 SIP Trunk.


Step 3 – Add Inbound Route
Create an Inbound Route for each trunk group following the procedures identified in Inbound Routes, entering the TEL2IP User-defined Called Party digits configured on the FXS Port Settings for each group.
Scenario Three: FXO Trunk Connection to Paging System
Many paging systems require an FXO connection from the PBX interface. In many cases, these paging systems will not expect digits to be sent immediately as would be the case for FXO trunks connecting to the PSTN network. Instead, the paging system will automatically connect the voice path when the PBX FXO circuit goes off-hook. It will then connect its DTMF receiver expecting the page originator to dial one or two digits for selecting the specific paging zone that should be connected for the page announcement.
The FXO settings in the Analog Gateway support the concept of “Waiting for Second Dialtone” – in other words, digits are not outpulsed when the analog call is being established; instead, the voice path will be established and the gateway will send in-band DTMF digits based on what the user entered on their telephone dialpad. This is configured on a per FXO port basis, so it can be applied to the either of the above two trunk programming scenarios.
Step 1: Additional FXO Gateway Settings
On the FXO Gateway card:
- After setting up a Profile on the FXO Gateway card that connects to the UCX as described in either scenario above
- Navigate to the Port / FXO Port Settings page and click Add
- Assign the desired Profile, assign a unique Group ID, set the Enable Port to yes, and select the Port Number that is connecting to the paging system

- Set the entry labelled IP2TEL Dialed Called Number to Yes (Note: this label will be changed to Use Secondary Dialtone in an upcoming release)

- Then press Save

On the UCX:
- Create a SIP Trunk as described in either scenario above
- Navigate to PBX / PBX Configuration / Outbound Routes
- Click Add Route

Screenshot - Provide a Route Name (eg. Page)
- In the Dial Patterns that will use this Route section, add a desired dial string that the UCX will use to connect to the paging system into the Prefix field in the first entry (eg. 888)
- Select the SIP Trunk set up to the FXO Gateway (eg. Page_Trunk)
- Click Submit Changes, and then Apply Config

You can now program a key on any telephone set to dial the digits 888, which will automatically connect to the paging system. Once connected, the phone user can enter in the zone using their DTMF dial pad.
