
Overview
This document provides configuration instructions for a Fortinet FortiGate firewall to support Galaxy UCX / InfinityOne communications.
The procedures below were developed using FortiOS v5.2.6 build 211. Menu names and screen layouts may vary between FortiOS versions, but the underlying configuration concepts remain generally applicable.
Configuration Summary
The configuration consists of the following steps:
- Disable the Fortinet SIP ALG/session helper.
- Create a Virtual IP (VIP) for the UCX server.
- Create the required UCX services.
- Group the services into a single service group.
- Create an inbound firewall policy allowing the required traffic to the UCX server.
- Allow the UCX server to use the Fortinet’s existing outbound Internet policy.
Network Information Required
Before beginning the configuration, gather the following information:
| Item | Example |
|---|---|
| Fortinet WAN Interface | WAN1 |
| Public/External IP | 203.0.113.10 |
| UCX Internal IP | 192.168.10.50 |
| UCX SIP Port | UDP 5060 |
| UCX RTP Ports | UDP 10000–13999 |
| UCX XSTIM Port | TCP 7000 |
| InfinityOne Port | TCP 21326 |
Important: Replace the example IP addresses and interface names with the actual values used at the customer site.
Step 1 – Disable SIP ALG
Fortinet’s SIP ALG and SIP session helper can interfere with SIP signaling, NAT, and RTP traffic. For UCX deployments, the SIP helper should be removed so that the UCX system can handle SIP communications directly.
1.1 Access the Fortinet CLI
The Fortinet CLI can be accessed either:
- From the FortiGate GUI using the CLI console; or
- Through an SSH connection to the FortiGate.
1.2 Locate the SIP Session Helper
At the CLI, enter:
config system session-helper
show
Look through the displayed configuration for an entry similar to:
edit 13
set name sip
set protocol 17
set port 5060
next
The entry number may be different on another FortiGate. Do not assume that SIP will always be entry 13.
In the example above, the SIP helper is entry 13.
Delete the SIP session helper:
delete 13
end
Replace 13 with the actual entry number shown on the firewall.
1.3 Configure the Fortinet VoIP ALG Mode
On FortiOS versions where this setting is applicable, configure the VoIP ALG mode from the CLI.
Enter:config system settings
set default-voip-alg-mode proxy-based
end
Then configure:config system settings
set default-voip-alg-mode kernel-helper-based
end
Version Note: FortiOS versions differ significantly in how SIP ALG, session helpers, and VoIP inspection are implemented. Verify the available default-voip-alg-mode options on the specific FortiGate before applying these commands. The objective is to prevent the FortiGate from altering UCX SIP signaling.
Step 2 – Create UCX Virtual IP (VIP)
The VIP creates the static NAT relationship between the public IP address and the internal UCX server.
For example: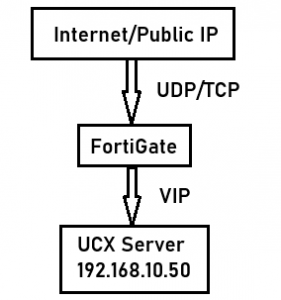
2.1 Create Virtual IP
- Log in to the FortiGate GUI.
- Navigate to Policy & Objects → Objects → Virtual IPs.
- Click Create New.
Depending on the FortiOS version, the menu may be displayed simply as Policy & Objects → Virtual IPs.
2.2 Configure the VIP
Configure the VIP as follows:
- Name – Use a descriptive name (e.g. UCX)
- Interface – Select the Internet-facing interface. (e.g. WAN1)
Use the interface actually connected to the Internet at the site. - External IP Address/Range – Enter the static public IP address assigned by the ISP. (e.g. 203.0.113.10)
- Internal IP Address/Range – Enter the static internal IP address assigned to the UCX server. (e.g. 192.168.10.50)
Click OK to save the VIP.
Step 3 – Create UCX Services
Create firewall services for the ports required by UCX.
- Navigate to Policy & Objects → Services
The exact menu location may vary depending on FortiOS version.
3.1 Create UCX SIP Service
- Select Create New → Service
- Configure the parameters as in the table below.
Setting Value Name UCX-SIP Category VOIP, Messaging and Other Applications Protocol UDP Low Port 5060 High Port 5060 - Click OK to save the service.
Step 4 – Add Services to a Service Group
4.1 Create Service Group
- Navigate to Policy & Objects → Services
- Select Create New → Service Group
- Set the name to UCX-Services
- Click OK.
4.2 Add Services to Group
- Navigate to Policy & Objects → Services
- Locate UCX-Services
- Select Edit
- Under Members, click the + add button.
- Add the following:
- UCX-SIP
- UCX-RTP
- UCX-XSTIM
- UCX-InfinityOne
- When all four services have been added, click OK.
The resulting service group should contain:
UCX-Services
├── UCX-SIP
├── UCX-RTP
├── UCX-XSTIM
└── UCX-InfinityOne
Using a service group simplifies the firewall policy and makes future troubleshooting and configuration changes easier.
Step 5 – Create UCX Firewall Policy
The VIP defines the destination NAT, but a corresponding firewall policy is still required to permit the traffic.
- Navigate to Policy & Objects → IPv4 Policy
- Select Create New
- Configure the parameters as in the table below.
| Field | Description |
|---|---|
| Policy Name | FortiOS versions that support a policy name field should use a descriptive name. E.g. Internet-UCX or UCX-Internet. |
| Incoming Interface | Select the internet-facing interface. E.g. WAN1. Use the actual interface connected to the internet. |
| Source Address | Set to All. This permits traffic from any internet source. Security Recommendation: If the UCX installation has a known carrier, SIP trunk, remote office, or service-provider IP addresses, consider restricting the source addresses to those networks where practical. |
| Destination | The destination should reference the UCX VIP created earlier in STEP 2. E.g. UCX Depending on the FortiOS version, the VIP may appear as the destination address object in the policy. |
| Outgoing Interface | Select the interface where the UCX server resides. This will typically be the internal LAN interface. E.g. LAN Use the actual interface/VLAN containing the UCX server. |
| Service | Select UCX-Services created in STEP 3. This automatically permits the services contained within the group:
|
| NAT | Set NAT to Disabled. When using a FortiGate VIP, the VIP performs the destination NAT. Therefore, DO NOT enable the policy’s NAT option. |
- Click OK to save the policy.
Step 6 – Outbound UCX Traffic
A separate outbound policy specifically for UCX is normally not required.
The UCX server should use the FortiGate’s existing LAN-to-Internet policy to access the Internet.
The traffic flow should be as below:
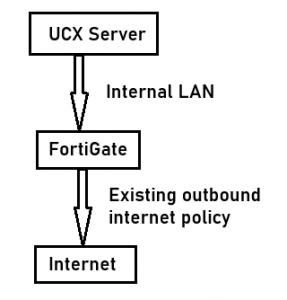
Verify that the existing outbound firewall policy permits the UCX server to access the Internet.
Configuration Summary
The completed FortiGate configuration should contain the following components.
SIP Configuration
- SIP session helper removed.
- Fortinet SIP ALG/VoIP inspection configured appropriately for the installed FortiOS version.
VIP
- VIP Name: UCX
- External IP: <Public UCX IP>
- Internal IP: <UCX Internal IP>
- Interface: <Internet/WAN Interface>
Services
UCX-Services group:
- UCX-SIP: UDP 5060
- UCX-RTP: UDP 10000-13999
- UCX-XSTIM: TCP 7000
- UCX-InfinityOne: TCP 21326
Firewall Policy
- Name: Internet-UCX
- Incoming Interface: WAN1
- Source: ALL
- Destination: UCX VIP
- Outgoing Interface: UCX/LAN Interface
- Service: UCX-Services
- NAT: Disabled
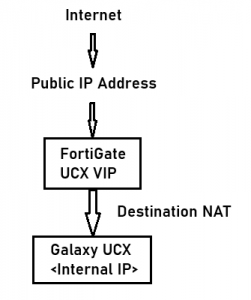
Inbound Traffic Flow
The expected inbound traffic flow is as below.
SIP Signaling
Internet → FortiGate → VIP → UCX
UDP 5060
RTP Media
Internet → FortiGate → VIP → UCX
UDP 10000-13999
XSTIM
Internet → FortiGate → VIP → UCX
TCP 7000
InfinityOne
Internet → FortiGate → VIP → UCX
TCP 21326
Troubleshooting Checklist
If UCX communication is not working after the firewall configuration, verify the following:
- UCX has a static internal IP address.
- The public IP address is correctly assigned to the FortiGate.
- The correct WAN interface is being used.
- The UCX VIP points to the correct internal UCX IP address.
- The SIP session helper has been removed.
- SIP ALG/VoIP inspection is not modifying UCX SIP traffic.
- UDP port 5060 is permitted.
- UDP ports 10000–13999 are permitted.
- TCP port 7000 is permitted.
- TCP port 21326 is permitted.
- The UCX-Services service group contains all four UCX services.
- The inbound policy references the UCX VIP.
- The inbound policy references UCX-Services.
- NAT is disabled on the inbound VIP policy.
- The UCX server has a valid default gateway pointing toward the FortiGate.
- The existing outbound firewall policy allows the UCX server to access the Internet.
- No upstream firewall or ISP equipment is blocking the required ports.
Important Considerations
These instructions were originally developed using FortiOS v5.2.6 build 211. Fortinet has changed SIP ALG, session-helper, VoIP inspection, VIP, and firewall-policy behavior across later FortiOS releases.
For this reason:
Always verify the available CLI commands and GUI options on the installed FortiOS version before applying the configuration.
In particular, do not assume that the SIP session-helper entry will always be numbered 13. Use:
config system session-helper
show
and identify the entry where:
set name sip
set protocol 17
set port 5060
appears.
Only delete the entry corresponding to the SIP helper.
