VVX 400 Series
Introduction
The Polycom VVX 400 Series are color 12-line mid-range Business Media Phones designed for today's office workers and call attendants who depend on crystal clear communications.
Key features include:
- 3.5" TFT (320 x 240)
- 12 lines or speed dial keys
- HD Voice up to 7KHz on all audio paths (Speaker, Handset, Headset)
- 2 x Ethernet 10/100 or GigE (VVX410 )
- Asian character support
- Hard Keys: 12-key dial pad, home, speaker, mute, headset, volume, messages, hold, transfer
- 4-way navigation cluster with center “select” key
- Supports VVX Expansion Module and VVX Color Expansion Module (Expandability up to 3 modules)

Configuration
STEP ONE: On the UCX Server
- Login to the UCX Web-based Configuration Utility
- Navigate to PBX - PBX Configuration - Extensions page
-
Add an Extension for a Generic SIP Device with the following basic parameters:
- User Extension (e.g. 505)
- Display Name
- secret
- If the UCX Server is Cloud hosted, under Device Options, set NAT Mode to Yes.
- Click on Submit to create the extension
- Press the Apply Config bar at the top
STEP TWO: On the VVX 400 Series Phone
Refer to https://www.poly.com/us/en/support/products/business-phones/vvx/vvx-400-410 or https://www.poly.com/ca/en/support/products/business-phones/vvx/vvx-401-411 for details on phone setup and usage.
Connect the phone to a network that is setup for DHCP. After initialization is complete, perform the following steps to obtain the IP address assigned to the phone:
- From the phone, press the Home key.
- Use the arrow keys to navigate to Settings then select it.
- Using the phone's keypad, press 4 (Status), press 1 (Platform), press 1 (Phone).
- Using arrow keys scroll down the display to find the IP address.
STEP THREE: Configuration via Web Interface
Accessing the phone's web interface
-
From a web browser, enter the IP address of the phone. (For example: https://192.168.1.131)
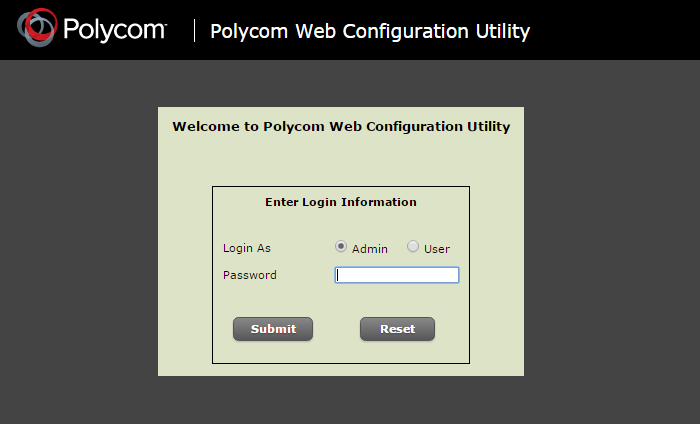
- Login as Admin, the default password is 456.
Configure Date and Time
-
From the top navigation menu bar, select Preferences -> Date & Time
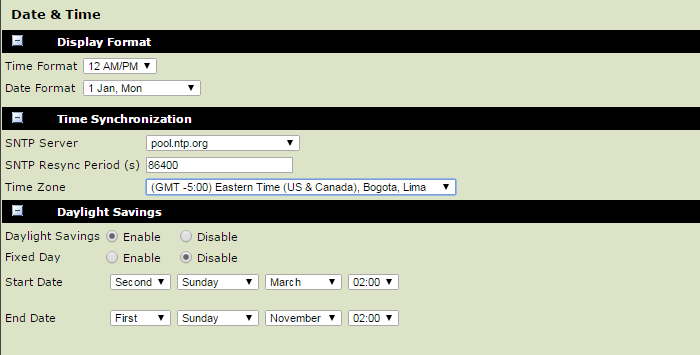
- Select a SNTP Server from the pull-down list.
- Select the desired Time Zone.
- Press the Save button.
Configure SIP Server and Line
-
From the top menu bar, navigate to Settings -> SIP
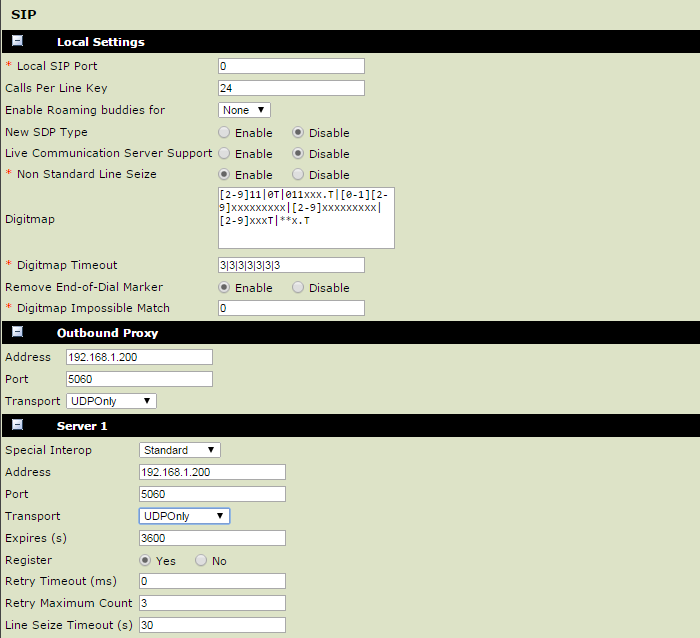
- Update the Digitmap dial plan information as desired.
- Change Remove End-of-Dial Marker field to Disable if you want to allow the use of # sign to dial immediately.
-
Under Outbound Proxy, update the following fields:
- Address: Enter IP address of the UCX Server
- Port: Enter the SIP port used (default is 5060 or 5960 for Cloud UCX)
- Transport: Select UDPOnly
-
Under Server 1, update the following fields:
- Address: Enter IP address of the UCX Server
- Port: Enter the SIP port used (default is 5060 or 5960 for Cloud UCX)
- Transport: Select UDPOnly
- Press the Save button.
-
From the top menu bar, navigate to Settings -> Lines, select the desired line from the panel on the left.
-
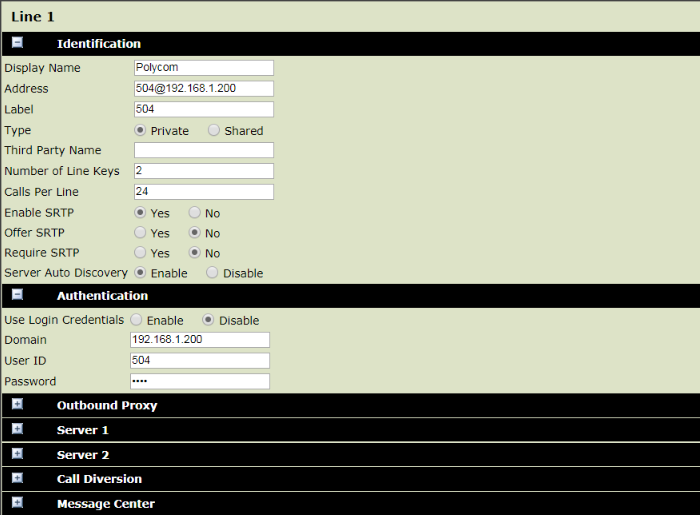
Under Identification, update the following fields:
- Display Name: Enter the CallerID display name
-
Address: Enter the SIP URI <extension>@<server>:<port>, e.g. [email protected] or [email protected]:5960
Important: You must include the port number if it is NOT the default port 5060. - Number of Line Keys: Enter the number of line keys for this extension
-
Under Authentication, update the following fields:
- Domain: Enter the domain name or IP address of the UCX Server
- User ID: Enter the user extension from STEP ONE
- Password: Enter the secret from STEP ONE
- Press the Save button.
- The phone display will now show a registered line(s).
Configure Message Center
-
From the top menu bar, navigate to Preferences -> Additional Preferences
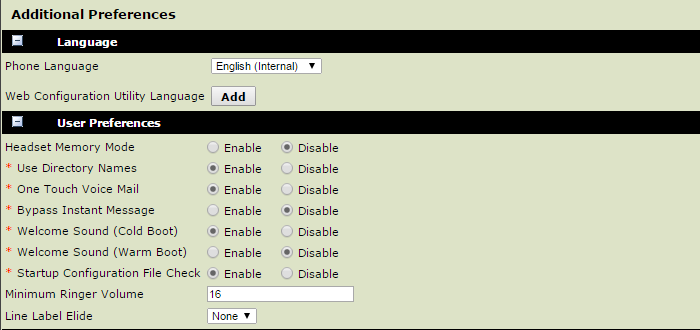
- To immediately dial voicemail when the Messages key is pressed, Enable the One Touch Voice Mail field.
-
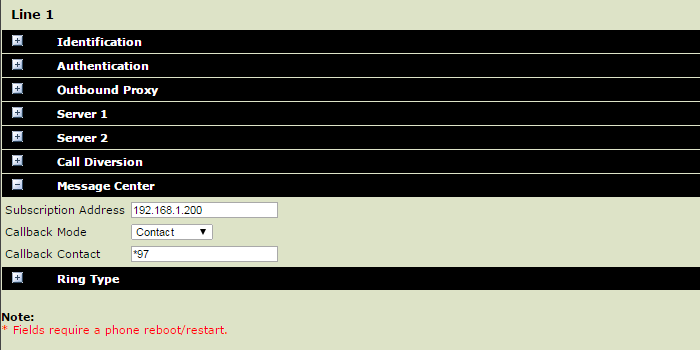
Next, navigate to Settings -> Lines and select the desired line from the left side panel.
-
Under Message Center, update the following fields:
- Subscription Address: Enter the IP address of the UCX Server
- Callback Mode: Change the mode to Contact
- Callback Contact: Enter the value *97
- When you have new voicemail message(s), the Message Waiting Indicator located at the top-right of your phone will flash.
- To retrieve your voicemail messages, press the Messages key.
Configure Line Keys
-
From the top menu bar, navigate to Utilities -> Line Key Configuration

-
To edit a configured line key, just select the line from the Active Line and Speed Dial Keys box.
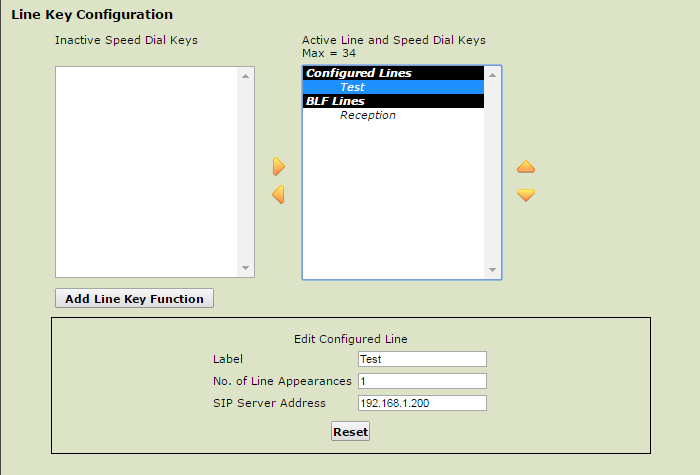
- Make the desired changes in the Edit Configured Line box and press the Save button at the bottom of the page.
-
To add a new line key, press the Add Line Key Function button.
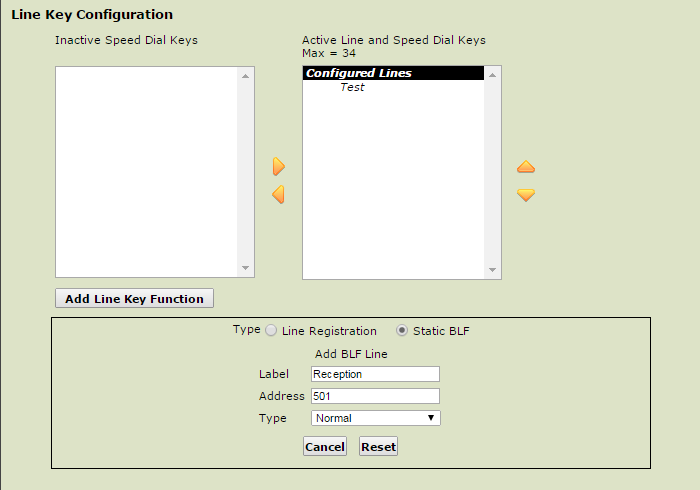
- Update the fields in the box that appears.
- Press the Save button at the bottom of the page to add the line key.
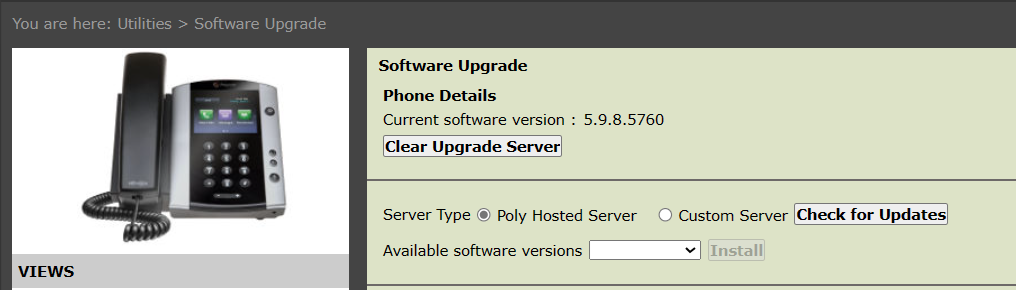
Software Upgrade
To update your software to the latest version:
- Go to Utilities -> Software Upgrade
- Click on Check for Updates
- If a newer version is available, click on Install.
- The phone will reboot.