UCx Wallboard Application
Feature Description
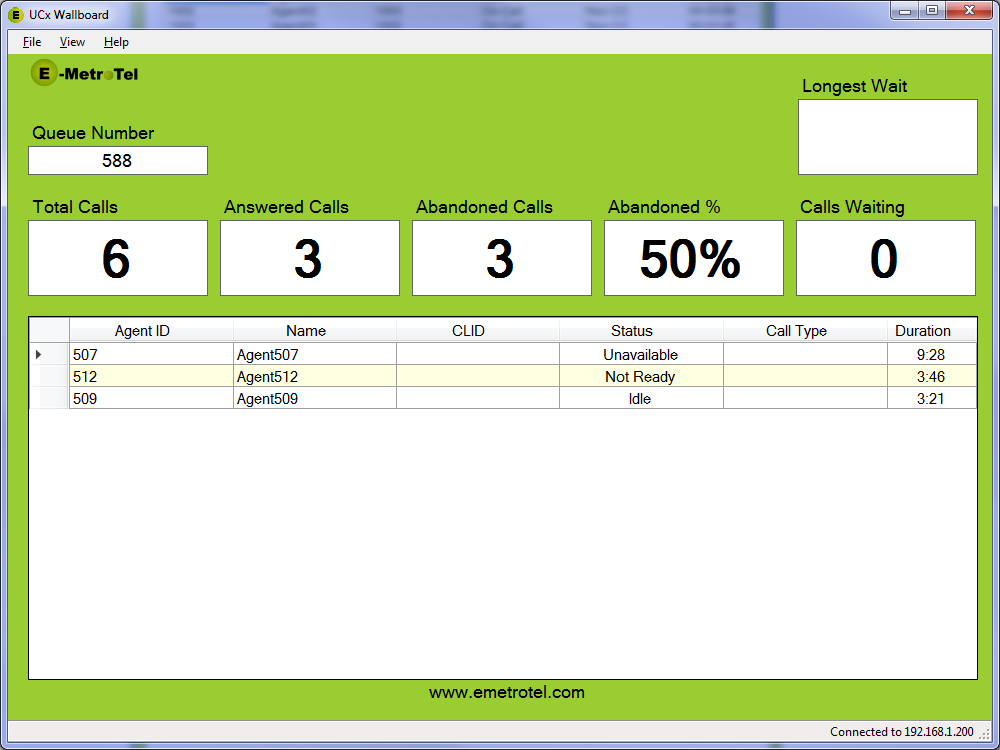
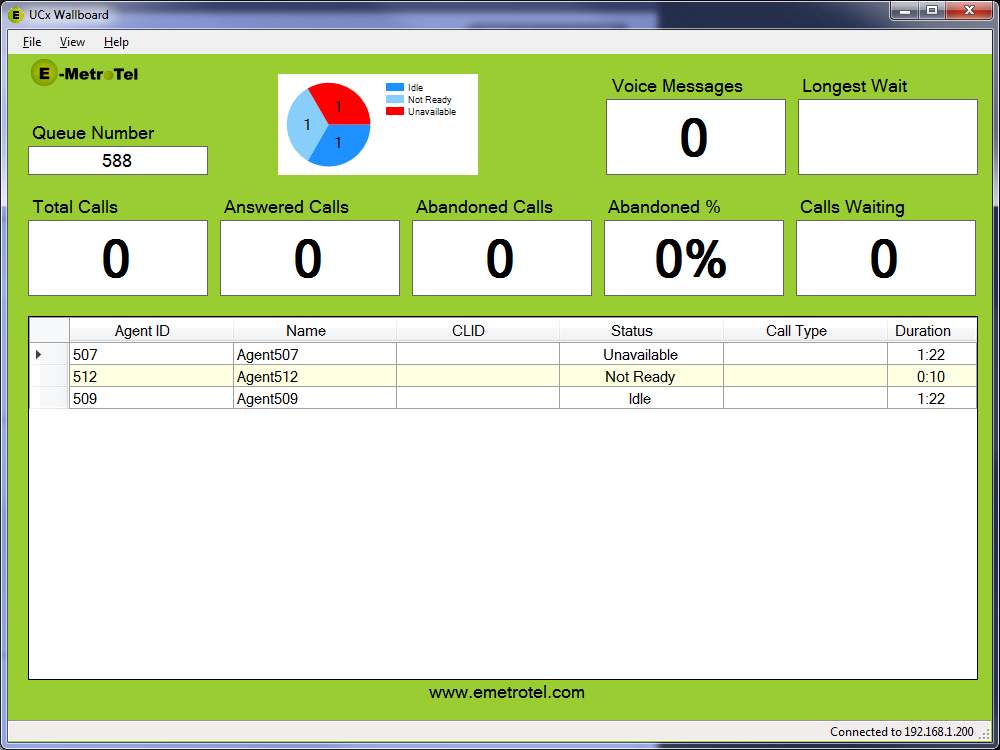
The UCx Wallboard application is designed to give a summary of the call centre operation at a given time. This application is mainly implemented to display various statistics from the call operation among Agents belonging to a certain queue. The statistics that are displayed on the wallboard application are:
- Total Calls: Total number of calls is obtained by adding calls that have been answered, calls that are presently in the queue and the calls that have been abandoned
- Answered Calls: The total number of calls that have been answered by the agents
- Calls Waiting: Total number of Calls that are presently waiting in the queue
- Abandoned Calls: Total number of Calls that entered this specific queue but the caller disconnected before being answered by an agent
- Abandoned Percentage: Total Percentage of abandoned Calls that entered this specific queue.
- Longest wait in Queue: Longest time a call has waited in the queue before being answered by an agent or the caller abandoned the call
- New Voice Mails: Total number of voice mails in the specified mail box.
The following information regarding Agents are also displayed, while they are established on a Queue or Non Queue call. This information is displayed for all agents belonging to the Queue selected.
- Agent ID: This is the Extension of the agent configured on the Asterisk Manager Interface
- Name: This is the name of the Agent
- CLID: Caller ID information
- Status: Status of the call, like Idle, Not Ready, Not Available, On Call etc.
- Call Type: Type of the call established, like CC or Non CC call.
- Duration: This is the duration of time the agent is on a call or sitting idle
Introduction
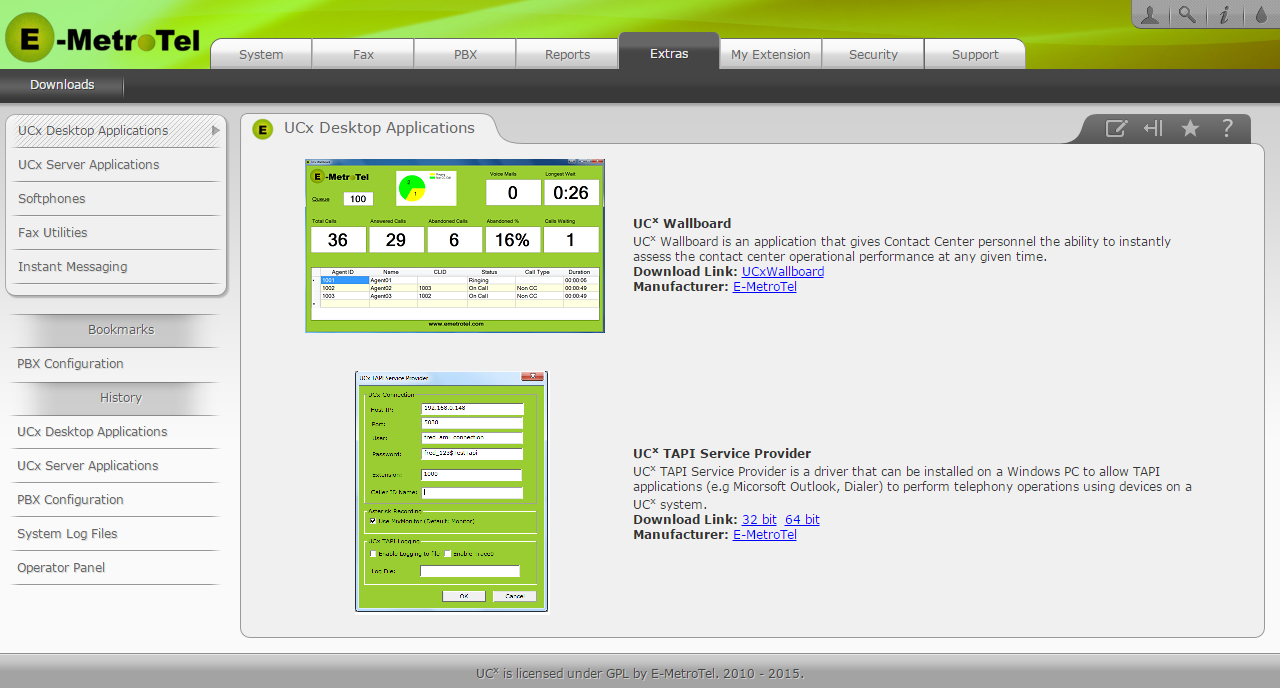
The UCx Wallboard application is a windows based application which can be installed on a windows computer. This application is installed using the UCx Wallboard installer program (UCx Wallboard.msi) which is downloaded from the UCx Web-based Configuration Utility. The installation process is just like any other windows based application install.
Pre-Requisites
The Wallboard application must be installed on a 64-bit operating system running Windows 7 and up.
Upgrade your UCx server to the latest software version. (See Software Update in the Administration Guide for details on how to upgrade your software.)
The UCx Wallboard application requires a license with access to the application. to be installed before it can be used. First obtain the license and then install the license code. (See Licenses in the Administration Guide for instructions on how to obtain and install a new license.)
There should be one or more queues configured with one or more agents belonging to each of the queues.
Step One: Download the application installer
To download the Wallboard application installer, perform the following steps:
- Open the UCx Web-based Configuration Utility
- From the Extras tab, select Downloads
- From the left side column, select UCx Desktop Applications (or E-MetroTel Applications on R4.0)
- Use the download link UCxWallboard to download the UCxWallboard.msi installer file onto your computer
Step Two: Install the Wallboard application
To install the application, perform the following steps:
- On your computer, locate the downloaded installer file from the previous step
- Double click on the file to launch the installer
- Follow the instructions on the installer window
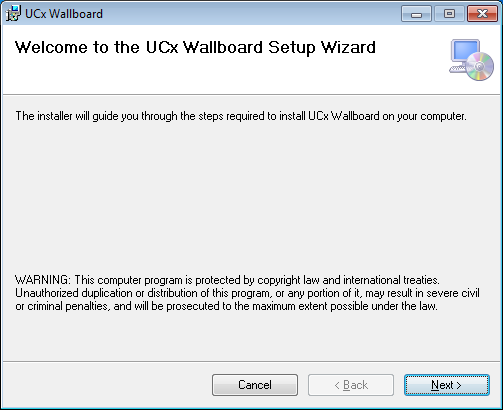
Once the installation is complete, a UCx Wallboard icon will be placed on your desktop.
Step Three: Configure the UCx Server
For the Wallboard application to function properly, the following configuration is required:
- Configure Queue Options
- Create an Asterisk manager interface
Configure Queue Options
See Queues in the Administration Guide for details on how to configure queues.
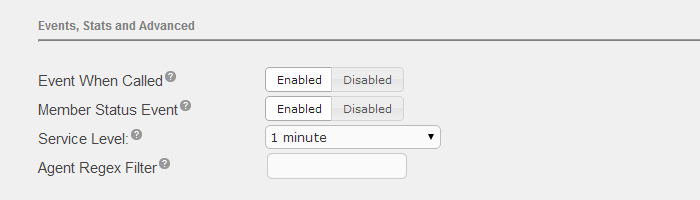
The following is required only for systems running Release 5.0 and below.
Make sure the following two fields under Events, Stats and Advanced section are set to Enabled:
- Event When Called
- Member Status Event
Create Asterisk Manager Interface
The Asterisk Manager interface is necessary because this is the interface where the Wallboard application attempts to connect to the UCx server to collect queue and agent information.
To create the Asterisk Manager interface, perform the following steps:
- Open the UCx Web-based Configuration Utility
- From the PBX tab, select PBX Configuration
- From the left side column, select Asterisk API
- Enter a descriptive name for the Manager name (e.g. agent)
- Enter a password for the Manager secret
-
The default values for the Deny and Permit fields are "0.0.0.0/0.0.0.0" and "127.0.0.1/255.255.255.0", this effectively blocks all devices on the network except for applications running on the UCx itself.
If you want to allow devices on your local subnet (e.g. 192.168.1.xxx) to use this account, then modify the Permit field to: ""127.0.0.1/255.255.255.0&192.168.1.0/255.255.255.0". - Select both Read and Write check boxes for the following fields:
-
- system
- call
- command
- agent
- user
- config
- reporting

Application Workflow
To launch the Wallboard application, double click on the Wallboard icon on your computer desktop. The application window will be displayed.
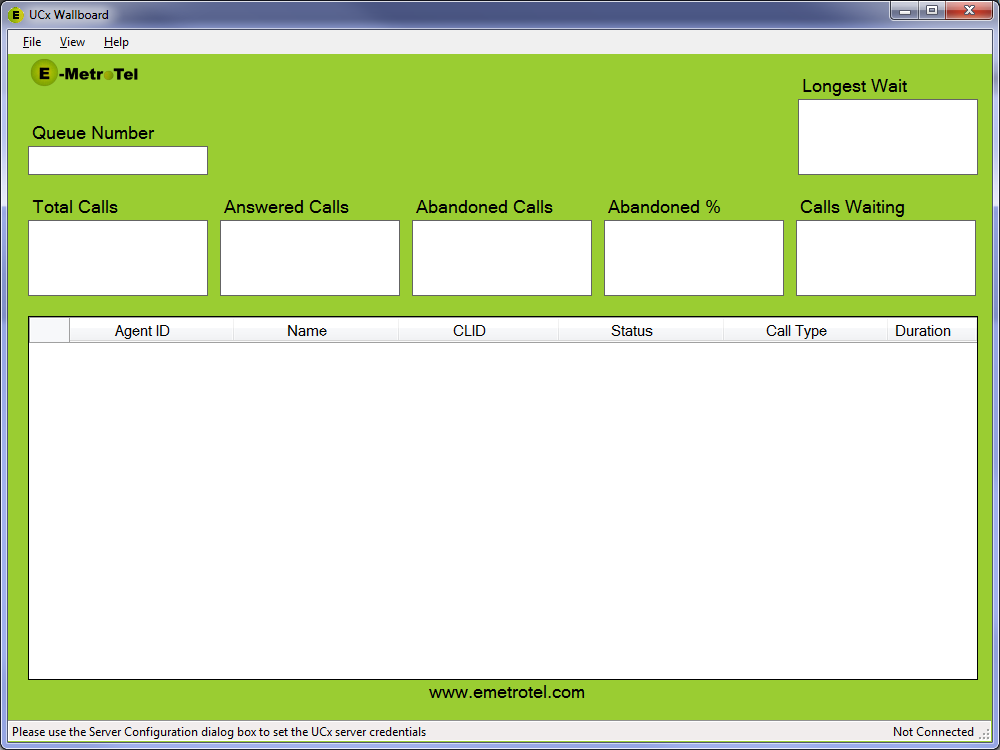
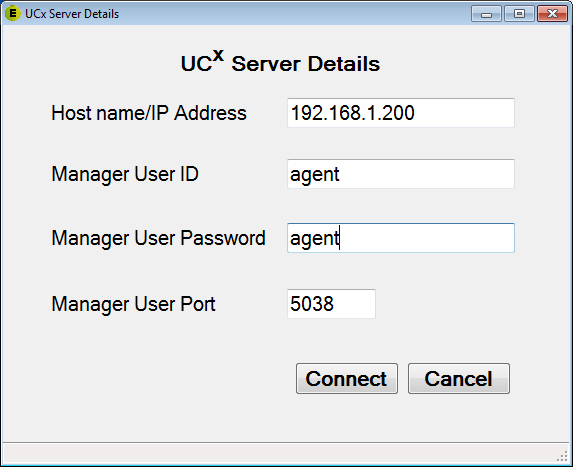
A message will appear on the bottom of the application window, indicating that the server credentials need to be set. To update the server credentials perform the following steps:
- Go to the top menu, select View -> Server Configuration
- Enter the UCx server host name or IP address
- Enter the Manager User Id and Password as configured for the Asterisk Manager Interface
- Press the Connect button to initiate connection with the UCx server
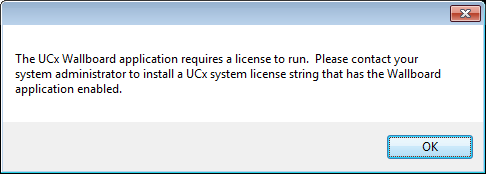
Once the connection to the UCx server is established, the application first checks if the UCx server is licensed to use the application. If not, then a message is displayed and the application exits when the OK button is pressed.
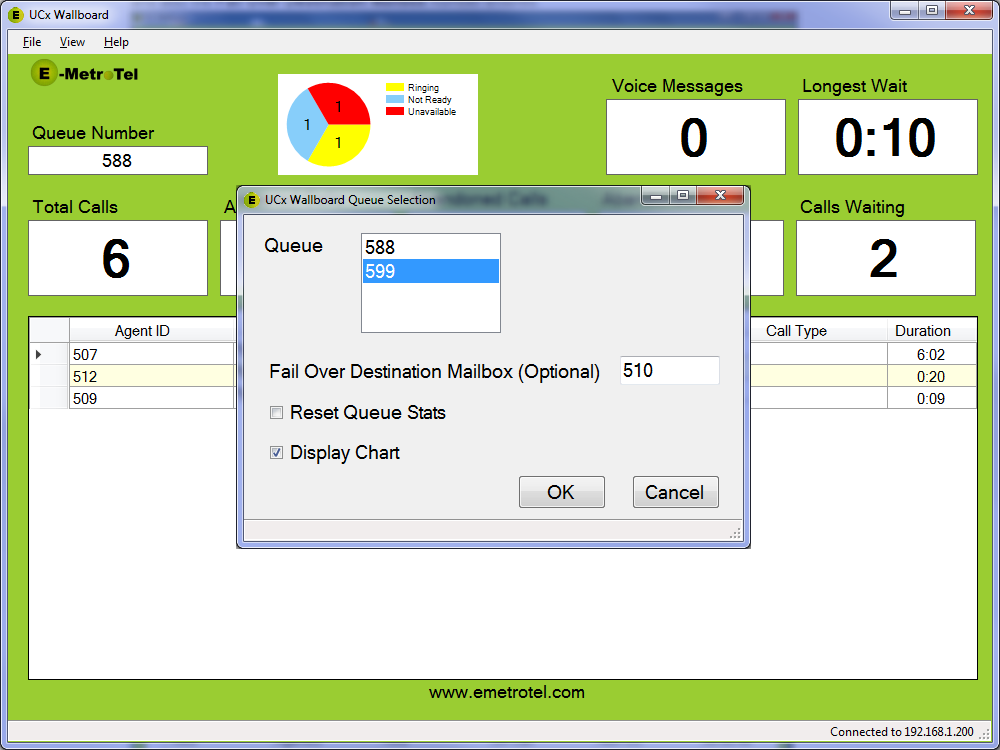
Once the application verifies that the license allows access to the Wallboard application, the Wallboard application will proceed to launch the Queue Selection window.
All the configured queues will appear in the Queue pull down list. Only one queue can be selected at a time.
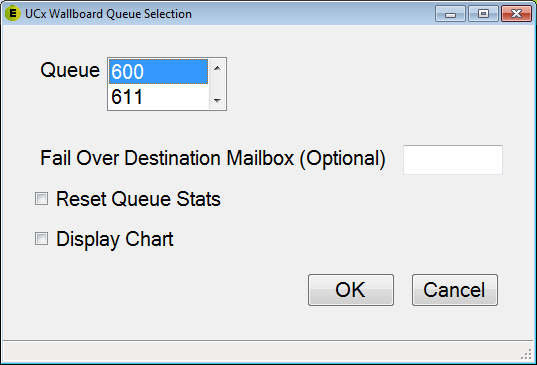
Select the desired queue number from the Queue pull down list.
There are three other options available in this window:
- Fail Over Destination Mailbox - Enter the mailbox number and the application will connect to the server and collect the number of voice mails in the mailbox.
- Reset Queue Stats - Selecting this checkbox will reset the stats, it does not affect the actual stats in the Calll Center Reporting. This ability allows Agent stats to be viewed each day with a "clean slate" as far as total number of calls or abandoned calls or answered calls are concerned.
- Display Chart - Selecting this checkbox will display a chart on the Wallboard application with some agent related information, as in how many agents are Idle, on a Non CC call, in Not Ready State and Ringing State.
The application window shown below is an example of the Wallboard display with Display Chart selected, and also the Fail Over Destination Mailbox number entered.
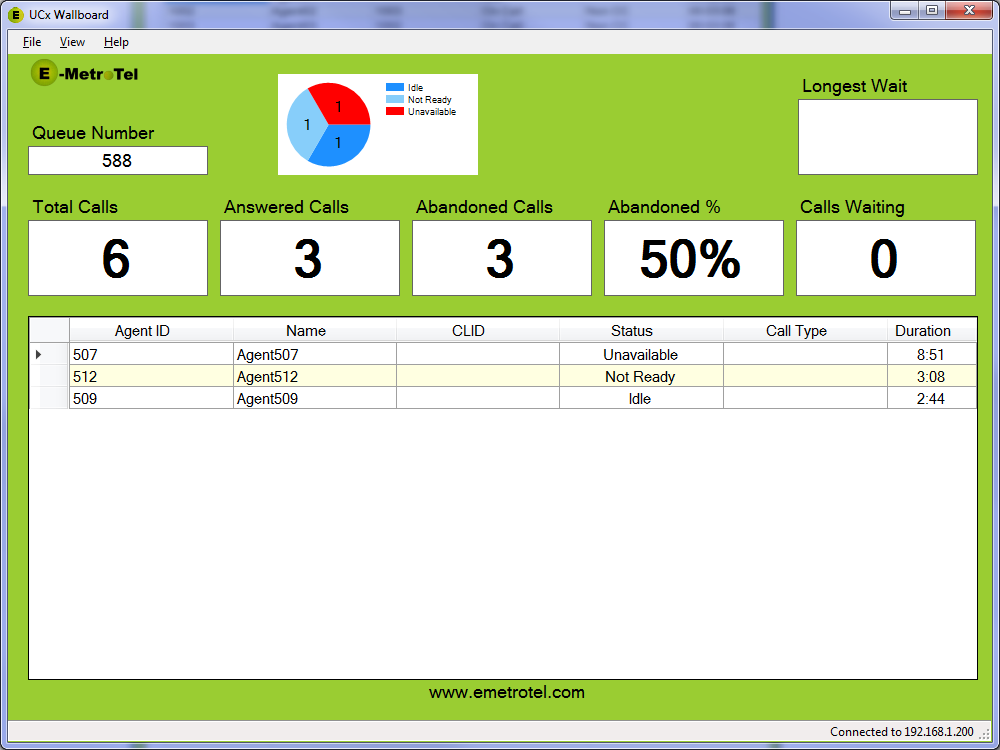
Another example of the Wallboard display after a few calls coming in and out of the agent queue with agent call stats updated live.

The application can be launched for a different queue number by selecting from the top menu View -> Queue Configuration . You can update the options as well.
If the Fail Over Destination Mailbox number is not entered, the Voice Mails box will not be displayed on the Wallboard.
If the option to Display Chart is not set, then the pie chart will not be displayed on the Wallboard display.