

Batch of Extensions
The Extensions Batch page allows you to import or update extensions using a CSV formatted file. The page also provides the option to delete all extensions.
To access the page, perform the following steps:
- Open the UCX Web-based Configuration Utility
- From the PBX tab, select Batch Configuration
- From the left side colum, select Batch of Extensions
Exporting Extensions
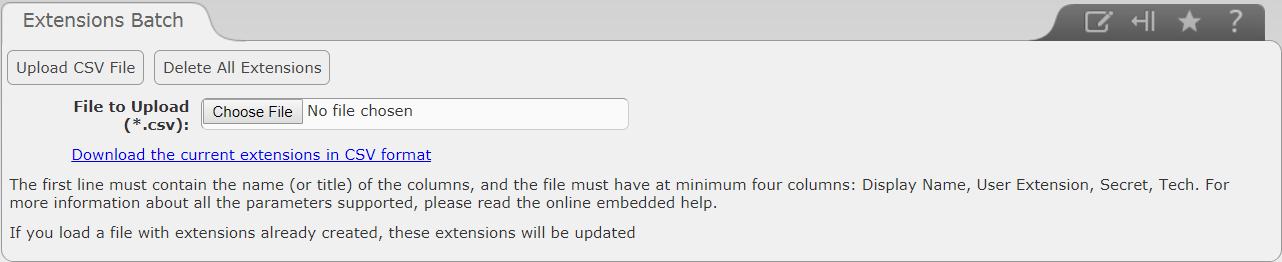
Select the Download the current extensions in CSV format link to download a CSV file template, which will contain all currently defined extensions, but can also be used as a base template.
| Column | Description |
|---|---|
| Display Name | Name to display for this extension |
| User Extension | The extension number |
| Direct DID | Number to call from external source for direct inward dialing to reach this extension |
| Outbound CID | CLID number seen on outbound calls |
| Call Waiting | Set to either: ENABLED or DISABLED |
| Secret | Password for this extension |
| Voicemail Status | Set to either: ENABLED or DISABLED |
| Voicemail Password | Password to access the voicemail box |
| VM Email Address | Email address that voicemails are sent to |
| VM Pager Email Address | Pager/mobile email address that voicemail notifications are sent to |
| VM Options | Separate options with pipe ( | ). For example: review=yes|maxmessage=60 |
| VM Email | Option whether voicemail is sent to email or not. Set to either: yes or no |
| VM Play CID | Option whether caller's phone number is played before message. Set to either: yes or no |
| VM Play Envelope | Option whether time date is played before message. Set to either: yes or no |
| VM Delete Vmail | Option whether to delete voicemail when sent to email address. This gives you option of receiving voicemail via email only. Set to either: yes or no |
| Instant Access | This option alllows the voicemail password prompt to be skipped when dialing from the mailbox extension. Set to either: yes or no |
| Context | This is voicemail context. Do not change from the default. Enter: from-internal |
| Tech | The type of extension. Enter either: sip or iax2 |
| NAT Mode | NAT setting for the SIP extension. Enter Yes, No, Force rport, Comedia, Automatic Force Both, Automatic Force port, Automatic Comedia, or Route. (UCX default is No). |
| Callgroup | Callgroup for which the device belongs. This is a value between 0 and 63. |
| Pickupgroup | List of callgroups which the device can initiate pickup. Separate values by comma, and use dash for ranges. For example: 0,3-8,13 |
| Disallow | If set to all will disallow all codecs. This is used if you want to specify a codec on the Allow parameter. |
| Allow | Specifies what codec to use. You must set the Disallow parameter to all. Set to gsm or ulaw or alaw. |
| Account Code | Accountcode for this device |
| Deny | Denies traffic from the specified IP address. Set as IP Address/Subnet Mask |
| Permit | Allows traffic from the specified IP address. Set as IP Address/Subnet Mask |
| Language Code | Specifies the language to be used on messages and voice prompts if the language is installed in UCX (2 letter lowercase |
| Record Incoming External | Setting for recording incoming calls from external sources. The values are: Always, On Demand or Never |
| Record Outgoing External | Setting for recording outbound calls from external sources. The values are: Always, On Demand or Never |
| Record Incoming Internal | Setting for recording incoming calls from other extensions on the system. The values are: Always, On Demand or Never |
| Record Outgoing Internal | Setting for recording incoming calls to other extensions on the system. The values are: Always, On Demand or Never |
| Record On Demand | Enable or disable the ability to do on-demand (one-touch) recording. Set to disabled or enabled |
| Record Priority | Call Recording policy priority relative to other extensions when there is a conflict between extension settings. Set a value of 0 to 20 (system uses default of 10) |
| XSTIM Specific Settings | |
| Device Type | Identify the type of XSTIM device |
| MAC Address | The MAC address of the device (using colons) |
| Number of Lines | The number of Line Appearances of the extension. (Requires an available Programmable key for each line specified, and Call Waiting to be enabled.) |
| Title Default | The Title display line on the phone |
| Main Text 0 | Text display line 0 on the phone |
| Main Text 1 | Text display line 1 on the phone |
| Main Text 2 | Text display line 2 on the phone |
| Country Indication Tone | The tonezone used for this phone. Leave blank for default. |
| RTP Port | RTP port for this device. Leave blank for default or value between 1024 and 65535. |
| RTP Method | RTP Method for this device. UCX default value is 4. |
| Time Format | Time format to display on this device. Enter 0:00am, 0h00, or 0:00 (UCX default) |
| Date Format | Date format to display on this device. Enter DD Mon, Mon DD, MM/DD, or DD/MM (UCX default) |
| Timezone Offset | Extensions Offset (in minutes) from the UCX server time. Enter multiple of 30 between -720 and 780. |
| LCD Contrast | LCD Contrast for this device from 0 to 15 (UCX default is 5) |
| Ring Volume | Ring Volume for this extensionfrom 0 to 14 for Infinity phones, all other phones are 0 to 7 (UCX default is 2) |
| Ring Style | Ring pattern for this device from 0 to 7 (UCX default is 1) |
| Call History | Allow call history to be displayed. Enter Enabled (UCX default) or Disabled. |
| Dial Pad Feedback | Dial pad feedback behavior for this extension. Enter Default, None, Click, or DTMF |
| Soft Transfer Type | Type of Transfer invoke when Transfer softkey is pressed. Enter Default, Attended, Asterisk Blind, or Asterisk Attended |
| Hotdesking | Allow or disallow hotdesking to be used on this device. Enter Default, Disallow, or Allowed |
| Hotdesking Password | Enter the hotdesking password to be used for this extension. Enter no more than 8 digits. |
| SRG Mode | The SRG mode for this extension. Enter Normal (UCX default) or Local Always. |
| Key 2 Label |
The Label to be displayed on the Key "n". Enter any string from 1 to 9 characters. For right side justification, use a 9 character string padded from the left with spaces.
Note: Up to 30 Keys can be configured. |
| Key 2 Digits |
The digit string to be dialed when Key "n" is pressed. Can also contain the following values: Fxxx (Norstar/BCM feature code), xxxx (Speed dial), xxxB (BLF), xxxR (Ringing BLF).
Note: Up to 30 Keys can be configured. |
| ... | |
| ... | |
| Key 30 Label |
The Label to be displayed on the Key "n". Enter any string from 1 to 9 characters. For right side justification, use a 9 character string padded from the left with spaces.
Note: Up to 30 Keys can be configured. |
| Key 30 Digits |
The digit string to be dialed when Key "n" is pressed. Can also contain the following values: Fxxx (Norstar/BCM feature code), xxxx (Speed dial), xxxB (BLF), xxxR (Ringing BLF).
Note: Up to 30 Keys can be configured. |
Importing Extensions
In the CSV file, you must provide at least the following 4 columns: Display Name, User Extension, Secret, and Tech for SIP and IAX2 extensions if there are any. Other fields can be left blank.
Select the Choose File button to bring up the browser to select the file to import.
Select the Upload CSV File button to upload the selected extensions CSV file into the system.
Deleting Extensions
Select the Delete All Extensions button to delete all extensions. All corresponding voicemail boxes and voicemail messages will also be deleted.