1. Feature Description
The InfinityOne Wallboard application provides a real-time summary of the call center operation. This application is mainly implemented to display key call center queue and agent statistics for one or more, or even all of the queues. The Wallboard can be displayed on one or more PCs using the InfinityOne Browser interface. Each Wallboard user can choose between displaying a single queue of their choice, or can view an array of all the queues that they configure.
The statistics that are displayed for each selected queue in the wallboard application are:
- Total Calls: Total number of calls is obtained by adding calls that have been answered, calls that are presently in the queue and the calls that have been abandoned by the caller or were passed to a Fail Over Destination as defined in PBX/Queue settings
- Answered Calls: The total number of calls that have been answered by the agents
- Calls Waiting: Total number of Calls that are presently waiting in the queue
- Abandoned Calls: Total number of Calls that entered this specific queue but the caller disconnected or were passed to a Fail Over Destination as defined in PBX/Queue settings
- Abandoned Percentage: Percentage of the total calls in this specific queue that were abandoned.
- Longest wait in Queue: Longest time an currently waiting call has waited in the queue before being answered by an agent or the caller abandoned the call
The following information regarding Agents are also displayed, while they are established on a Queue or Non Queue call. This information is displayed for all agents belonging to the Queue selected.
- Agent ID: This is the Extension of the agent configured on the Asterisk Manager Interface
- Name: This is the name of the Agent
- CLID: Caller ID information
- Status: Status of the agent, like Idle, Not Ready, Unavailable, On Call etc.
- Call Type: Type of the call established, like CC or Non CC call.
- Duration: This is the duration of time the agent is either on a call or is sitting idle
2. Introduction
The InfinityOne Wallboard application is included as part of InfinityOne. It is a licensed feature and is available for unlimited use within the InfinityOne application once the license is installed on the UCX Server. You must use the InfinityOne Browser interface to view the Wallboard; it is not supported on the Mobile interface.
3. Prerequisites
Upgrade your UCX server to the latest software version. (See Software Update for details on how to upgrade your software.)
There should be one or more queues configured with one or more agents belonging to each of the queues. (See Call Center documentation for detailed instructions.)
The InfinityOne package must be installed on the UCX Server. (See InfinityOne – Install the infinity_one Package on the UCX for detailed instructions.)
The InfinityOne Wallboard application requires a license with access to the application (see Installation below).
4. Installation
Step 1 – Install the License
To request a new license that includes the Wallboard application, follow the standard E-MetroTel licensing process as noted in Product Licensing.
If you have successfully licensed the Wallboard functionality you will see the “WB” code in the Product Code on the License Details page: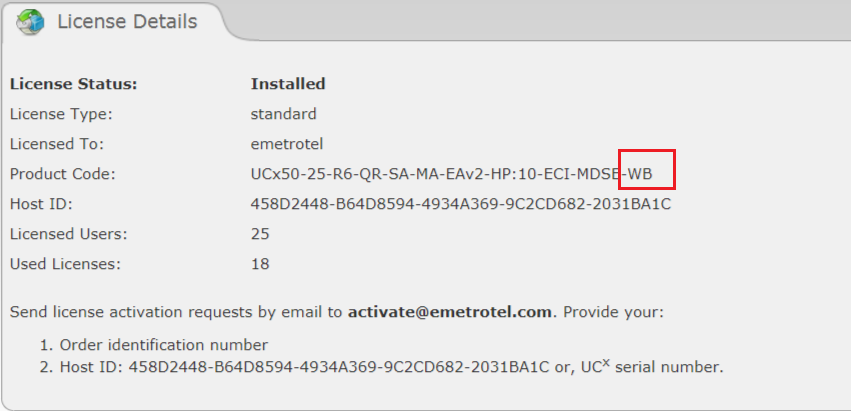
Step 2 – Install the InfinityOne package
If InfinityOne is already installed on the system, you can skip this step.
Otherwise, go to InfinityOne – Install the infinity_one Package on the UCX and follow the instructions to install and configure InfinityOne.
5. Configuration
Step 1 – Enable the Wallboard application
The first time you configure any Wallboard capabilities, you must log in to the InfinityOne application from the Browser interface as an Administrator.
- Click on the account box (top left where your username and avatar are shown)
- Select Administration -> Wallboard
- Click the Wallboard Enabled -> True button
- Update Wallboard Navigation Title as desired. This title will show up in the left navigation panel of InfinityOne. This is shown on all InfinityOne clients that have been allowed access to the Wallboard.
- Set the Show Chart option to True if you want each Wallboard Queue screen to have a graphical summary of queue status. Otherwise, set the Show Chart option to False This is shown on all InfinityOne clients that have been allowed access to the Wallboard.
- Scheduled Reset Type controls whether users with Edit Wallboard Queue permission can adjust the timing parameters of scheduled resets. Users with Edit Wallboard Queue permission will always be able to perform a manual (immediate) reset.
Never The Scheduled Reset of the wallboard statistics cannot be changed by users with Edit Wallboard Queue permission None Users with the Edit Wallboard Queue permissions can set and subsequently change the reset schedule for specific Wallboards. Daily, Weekly, Monthly Sets the default reset schedule for all queues. Users with the Edit Wallboard Queue permissions can modify the reset for specific Wallboards. Note: Selecting Daily allows the administrator to schedule the default time of day; Weekly allows the selection of default time of day and day of week; Monthly allows the default time of day and the day of month to be configured.
- Click the SAVE CHANGES button

Step 2 – Configure Access Permissions
Access to the walboard-related settings and viewing information is controlled through the permissions assigned to users.
The permissions associated with Wallboard information are as follows:
| Permission | Description |
|---|---|
| View Wallboard Queue | Users with a role that has this level of permission can select and view wallboards on their screen. |
| Edit Wallboard Queue | Users with a role that has this level of permission can select and view wallboards on their screen and reset the queue statistics for the queue they are viewing. If the Scheduled Reset Type is set to anything other than Never, these users can change the schedule for a viewed queue. Users with this permission level can also edit the name of queues to replace the Queue Number on the Wallboard display. Note that name is presented to all InfinityOne users that have access to the Wallboard(s) but it does not change the name of the queue in the UCX |
| View Wallboard Administration | User will have access to the Administration -> Wallboard page. |
By default, only accounts with Administrator access can make changes to the Administration -> Wallboard page. The parameters on this page include:
- Wallboard Enabled
- Wallboard Navigation Title
- Show Chart
- Scheduled Reset Type
You may add specific permissions to other users that provides them access to this information.
Once the wallboard has been enabled by the administrator account, any user that has been authorized for viewing the wallboard queues, including the administrator, will have to log out of their InfinityOne account and log back in in order to access the Wallboard Queues.
The Wallboard role is one of the pre-configured roles that can be assigned to accounts when they are configured on InfinityOne (other roles can be created, defined, and assigned as well). By default, any account with an Admin role can view the wallboard queues. You can also set up specific accounts that only have access to the Wallboard queues and no other features, or you can allow any or all of the other roles to view the wallboards.
Limiting an account to only have Wallboard Viewing Capability
If you plan to have a monitor running on a PC that is dedicated to displaying the Wallboard information, perhaps in a dedicated Call Center environment, then you can create an account that is only given permissions to view wallboards.
To create an account with only wallboard role permissions:
- Click on the account box (top left where your username and avatar are shown).
- Select Administration -> Users.
- Click the Add User icon
 (top right of the page).
 - Complete the required account information.
- Select wallboard in the Role drop-down menu.
- Uncheck the Enable Softphone and Join default channels boxes. (this will prevent the account from having a softphone interface and join channels)
- Click the Save button.
Giving Access to Specific User Accounts
Once you have created accounts with other Roles, you can choose to allow individual accounts to access the Wallboard information.
To assign the wallboard role to a user:
- Click on the account box (top left where your username and avatar are shown).
- Select Administration -> Permissions.
- Find the column labeled Wallboard.

- Click on the Add user text entry box, and begin typing the name of a User account.
- Select the desired user account entry.
- Click Add.
Giving Wallboard Access to Specific Roles
Typically, if this option were used, it would be used to provide every account with a standard User role the option of viewing wallboards.
To assign wallboard view permission to the user role:
- Click on the account box (top left where your username and avatar are shown).
- Select Administration -> Permissions.
- Find the column labeled user.
- Scroll down the page to the row labeled view-queue.
- Select the checkbox under the user column.
- The setting is automatically saved when the checkbox is clicked and you will be notified with a “Permissions Changed” banner that will appear momentarily.


Note that the view-queue setting is already set for the wallboard role (highlighted in the green boxes above).
6. Join and View Queues
After the Wallboard application has been enabled, you have to logout of InfinityOne and log back in to see the option for WALLBOARD QUEUES appear in the left navigation panel.

Click on More Wallboard Queues … to see the list of available queues to join.
To join a queue:
- Click on the queue number to preview the real time statistics of the queue.
- If the option to Show Chart is set to False, then the pie chart will not be displayed on the Wallboard display.
- Click on the JOIN button at the bottom of the page to subscribe to this queue.

Repeat this for each of the queues that you intend to monitor from this account.
All your subscribed queues will appear on the left navigation panel.
View a Single Queue
After you have subscribed to the desired queues, you may click on an individual queue to see the display for that queue only.
View All Subscribed Queues
Click on All to see all the subscribed queues on one page.

The Wallboard application will display the subscribed queues on a single screen.

The INFO Button
When you are viewing an individual queue, the Info icon ![]() will appear on the top right corner of the wallboard display. Clicking this icon will allow the user to reset the statistics for that Queue, show the graphical Agent Status chart, and/or modify the name of the queue as displayed on the Wallboard.
will appear on the top right corner of the wallboard display. Clicking this icon will allow the user to reset the statistics for that Queue, show the graphical Agent Status chart, and/or modify the name of the queue as displayed on the Wallboard.
Reset Queues Stats
The statistics can be reset by clicking on the switch slider next to Reset Queue Stats.
You will be given an opportunity to confirm your decision:
You will also be notified when the server has reset the statistics.
Editing the Queue Name
If you have sufficient priveleges configured by your InfinintyOne Administrator, then you will have the option to edit the Queue Name field, and you will see a Pencil edit button when hovering over the right hand side of the field.
After clicking the pencil button, enter the queue name:
Clicking the green checkmark will save the name:
Exiting the Wallboard Queue Info window
You can click the X in the Wallboard Queue Info window to exit.
