
Overview
Infinity Web Client now supports three login methods:
- Internal (default method)
- Microsoft Single Sign-On (MS SSO)
- Google Single Sign-On (Google SSO)
Key Points
- Only one login method can be active at a time.
- The active login method is configurable by the Administrator at the system level.
- When a login method is selected, the login page displays only the active method
Login Methods
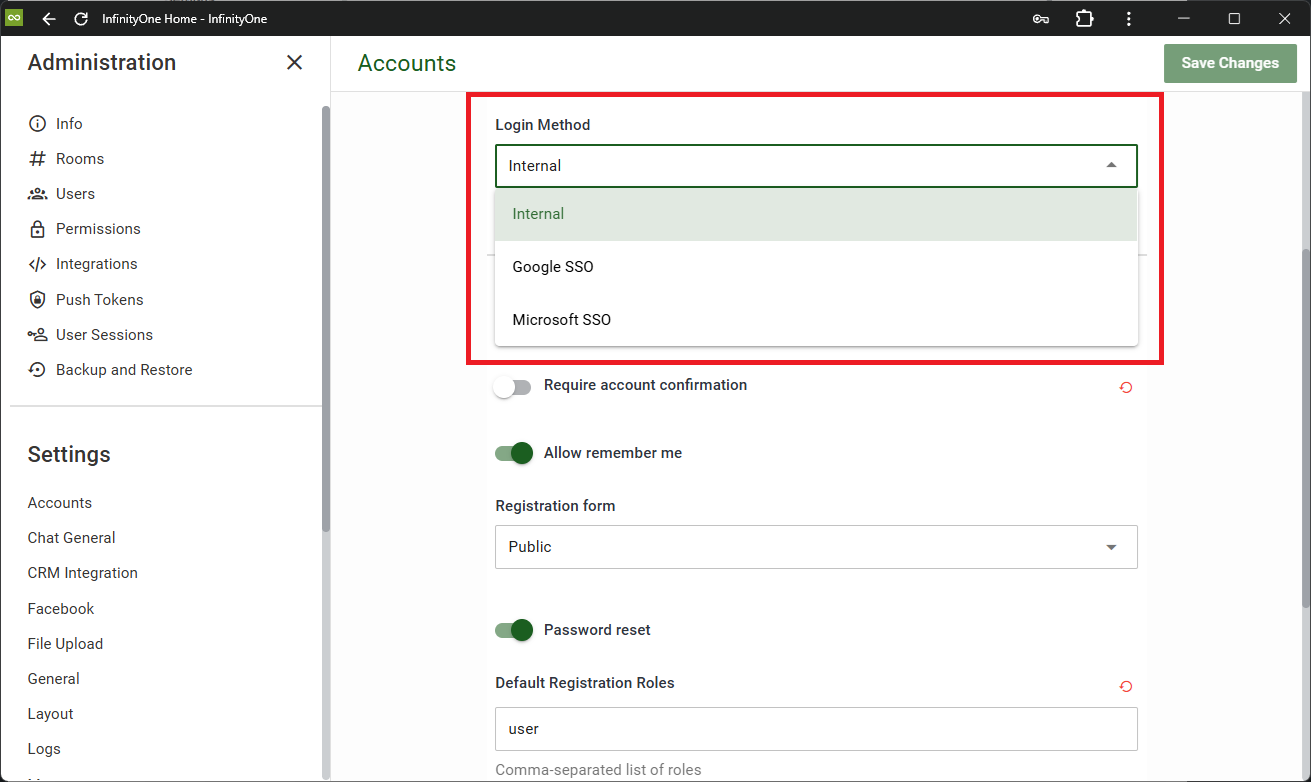
To set the login method:
- Login with an administrator account.
- Navigate to Administration -> Accounts page.
- Select the Login Method from the drop-down list.
- Click Save Changes button.
Internal (default)
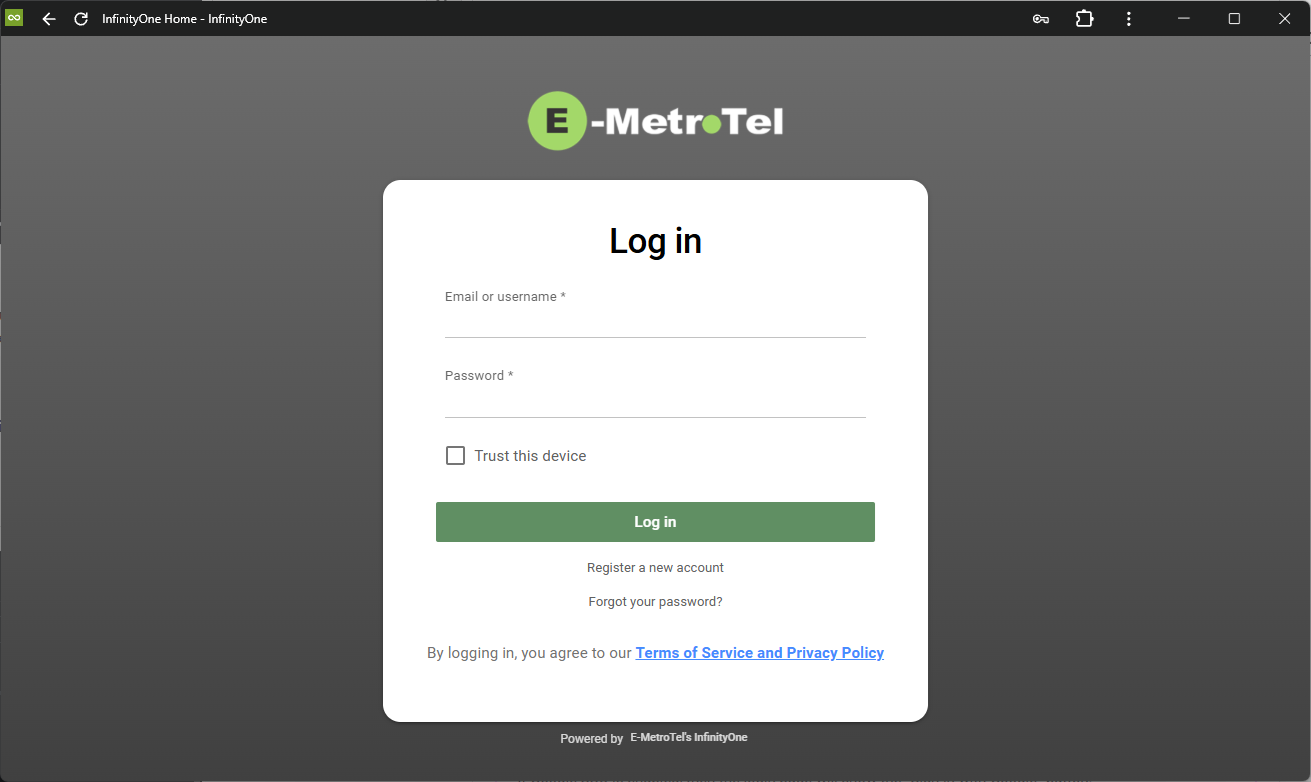
If the internal method is used (default), the login page will show the Username and Password fields. This method requires each user to have a local account within InfinityOne.
See Infinity Web Client – Users on how to create local user accounts.
Microsoft SSO
Before proceeding with the steps below, see how to Create SSO Credentials.
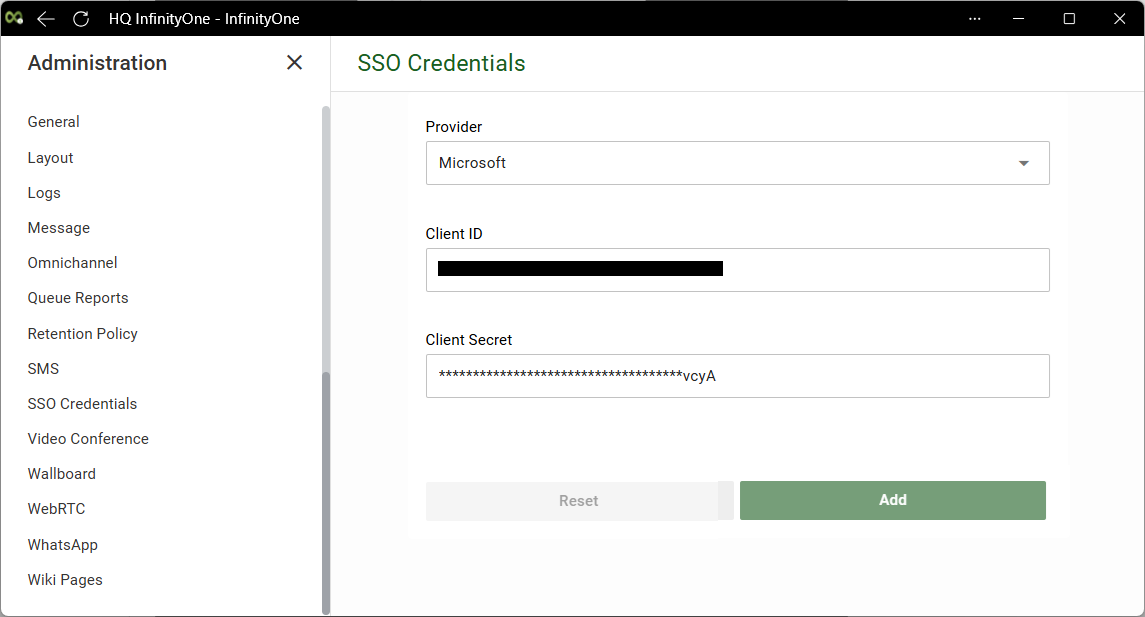
To add Microsoft SSO credentials:
- Login with an administrator account.
- Navigate to Administration -> SSO Credentials page.
- Select Microsoft as the Provider from the drop-down list.
- Fill in the Client ID and Client Secret.
- Click Add button.
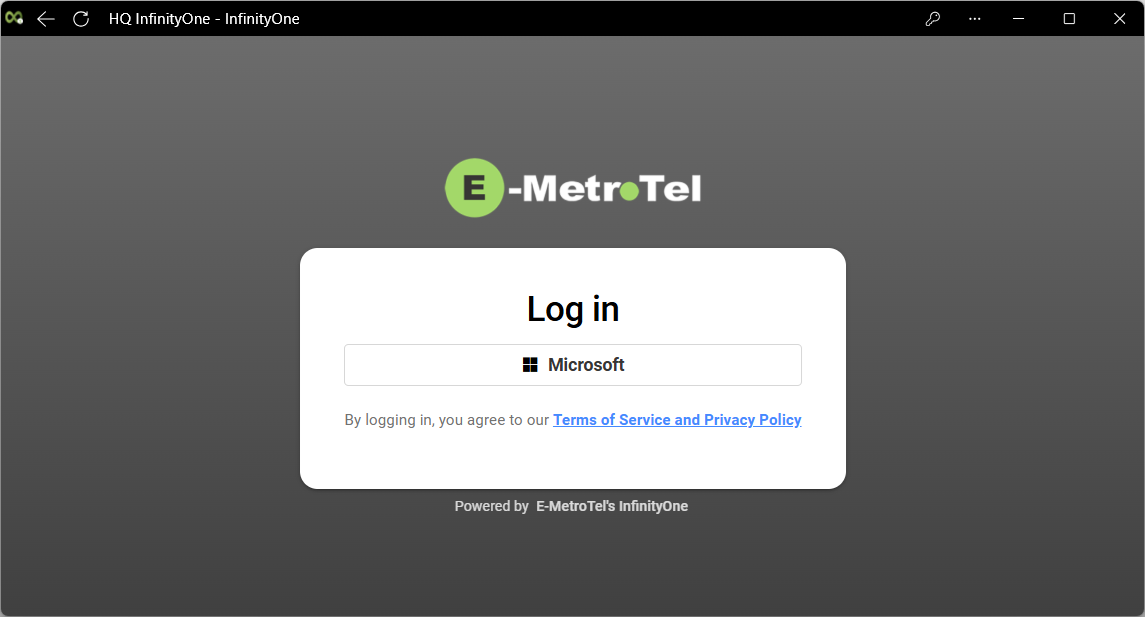
If Microsoft SSO is the selected Login Method, then the login page will show the “Microsoft” button.
Google SSO
Before proceeding with the steps below, see how to Create SSO Credentials.
To add Google SSO credentials:
- Login with an administrator account.
- Navigate to Administration -> SSO Credentials page.
- Select Google as the Provider from the drop-down list.
- Fill in the Client ID and Client Secret.
- Click Add button.
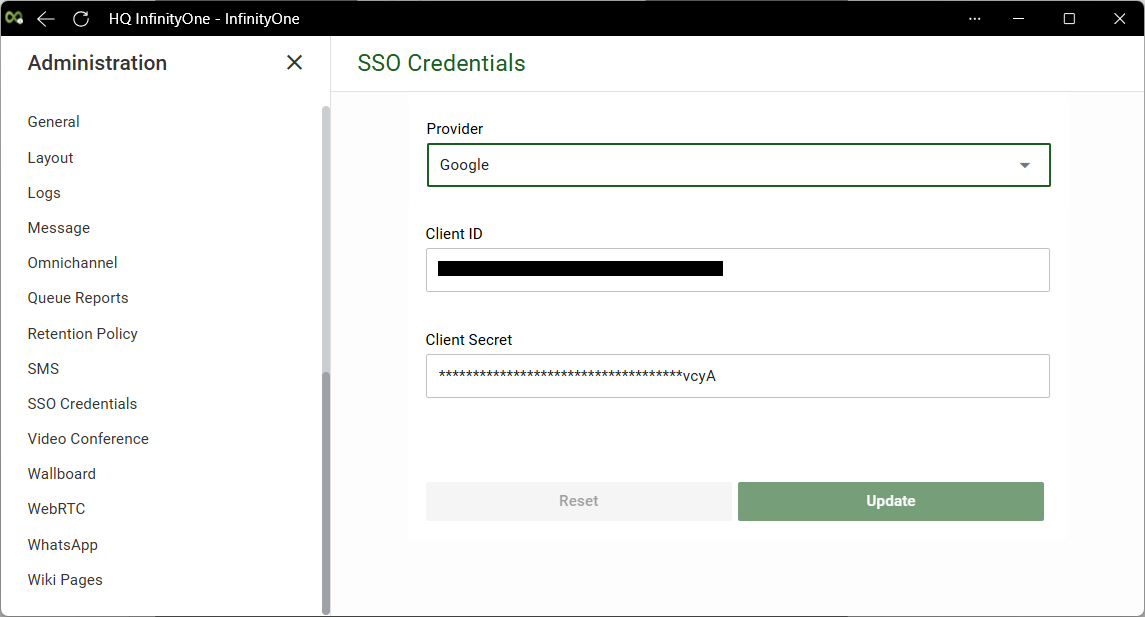
If Google SSO is the selected Login Method, then the login page will show the “Sign in with Google” button.
Create SSO Credentials
Microsoft
Follow these steps to create the Microsoft credentials required to configure Microsoft SSO.
STEP 1 – Register new application
- Go to Microsoft Entra admin center and sign in with at least an Application Developer account.
- Navigate to Entra ID > App registrations.
- Click + New registration.
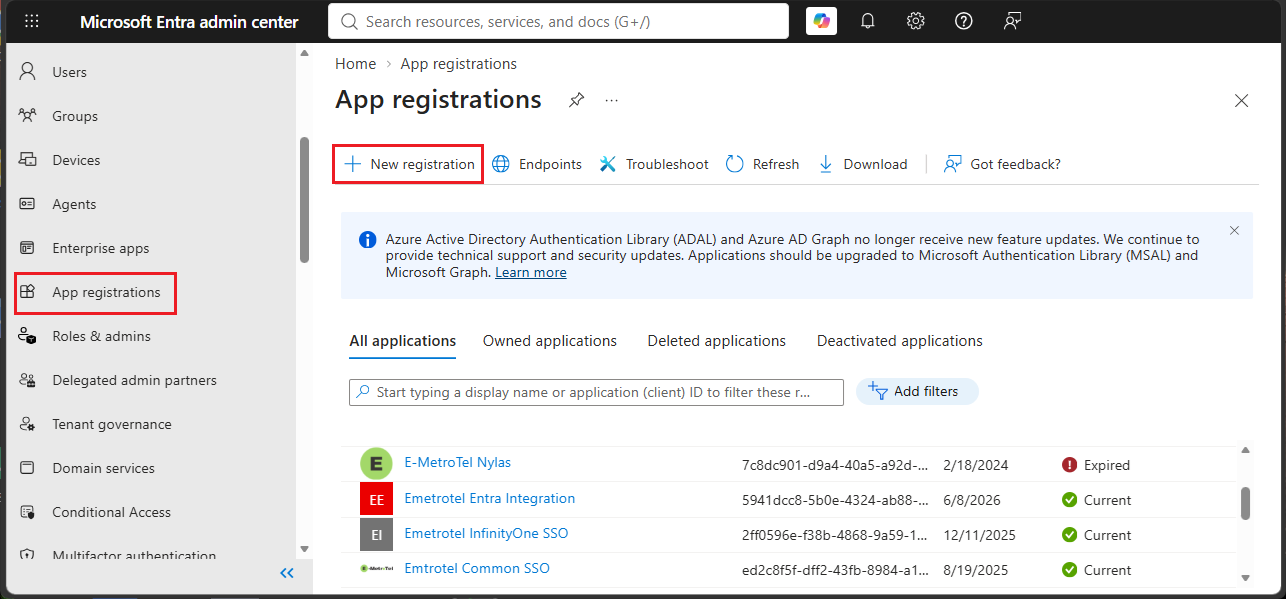
- Enter a meaningful Name.
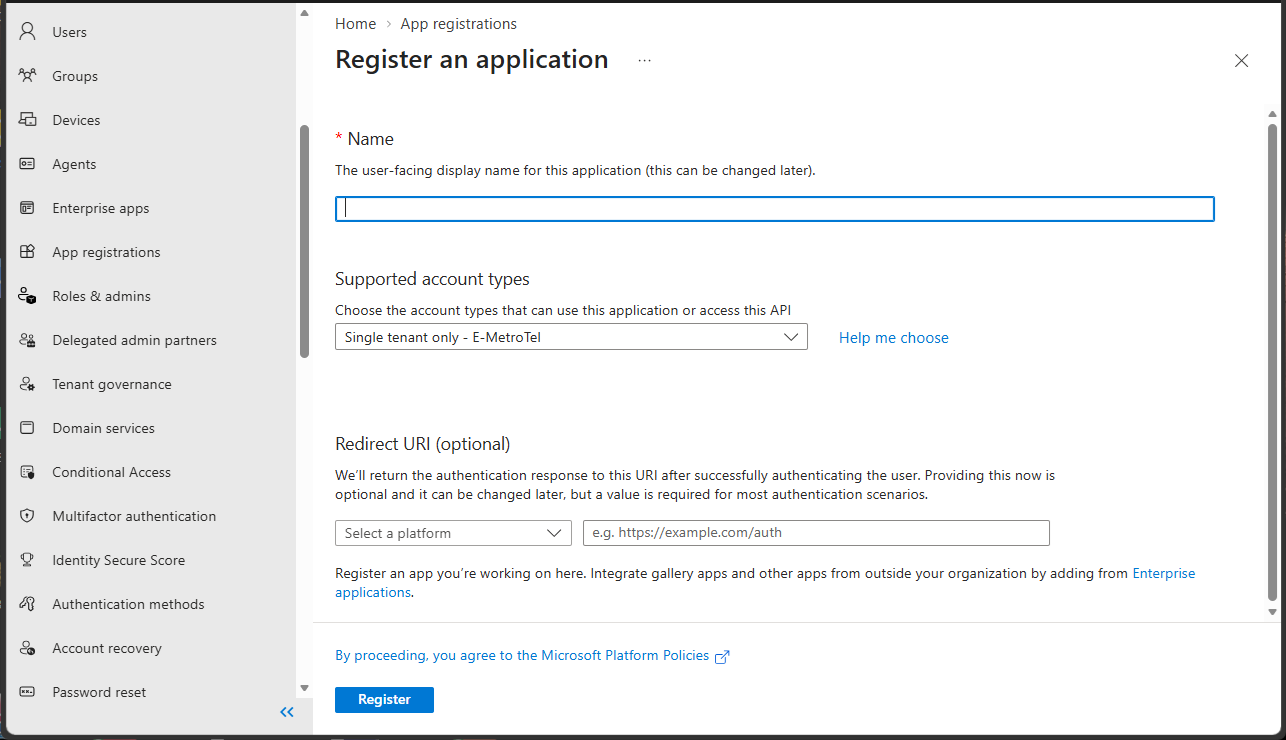
- Under Supported account types, select the option appropriate for your organization.
- Leave Redirect URI blank for now.
- Click Register button.
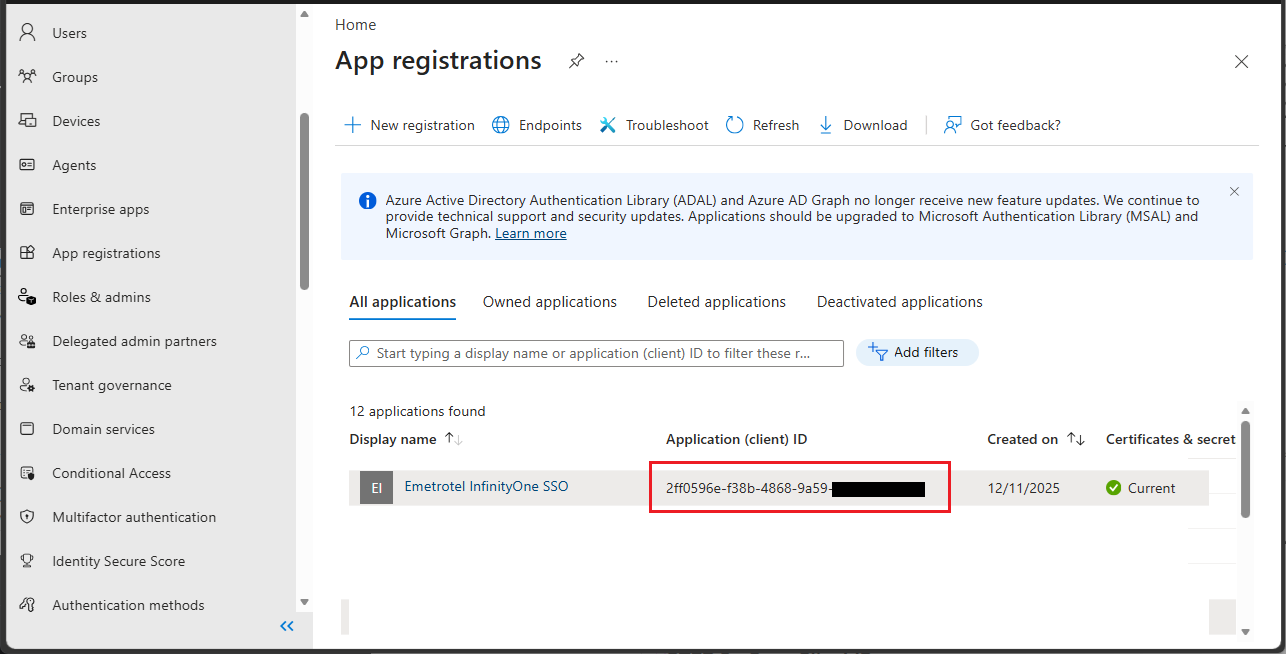
STEP 2 – Copy Client ID
After registration, you will see the applications overview page.
Copy and save the Application (client) ID.
STEP 3 – Add Redirect URI
The Redirect URI should be of this format:
https://[your_domain]/auth/[provider]/callback
For example, if your domain is test.emetrotel.net:21326, then the redirect URI will be:
https://test.emetrotel.net:21326/auth/microsoft/callback
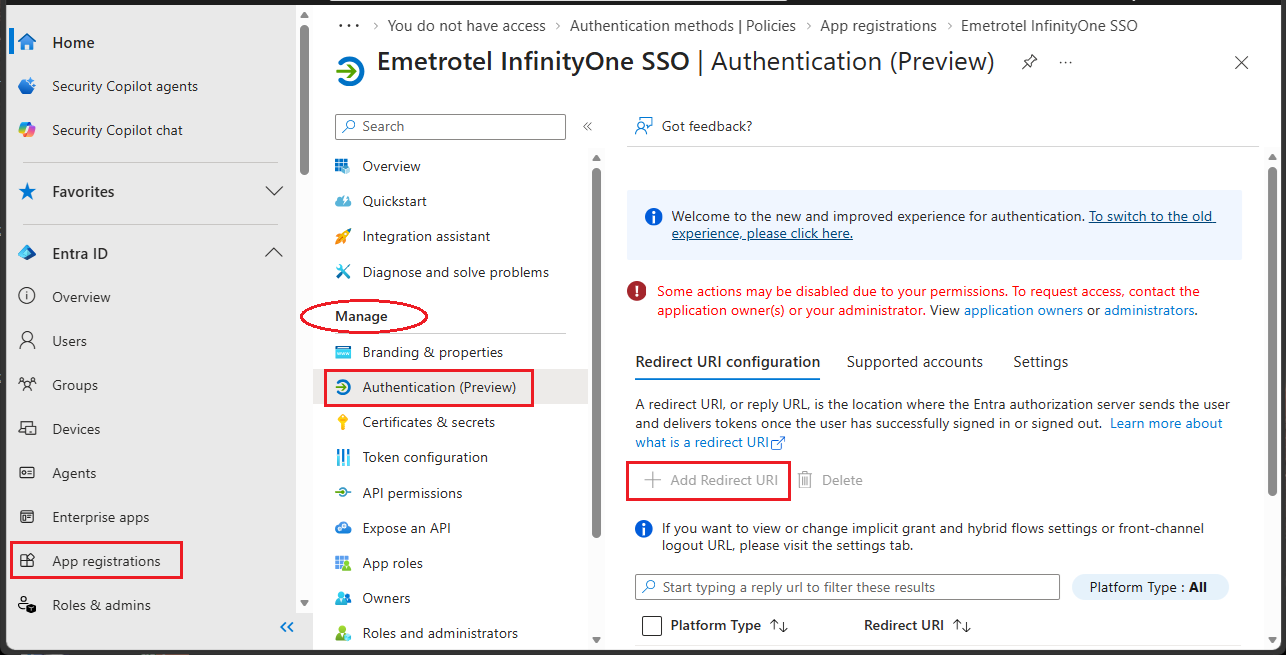
- Navigate to App registrations and select your app.
- Under Manage, select Authentication.
- On the Redirect URI configuration tab, select Add Redirect URI.
- On the Select a platform to add redirect URI pane, select Web.
- Under Redirect URIs, enter the Redirect URI.
- Click Configure to complete the platform configuration.
STEP 4 – Create Client Secret
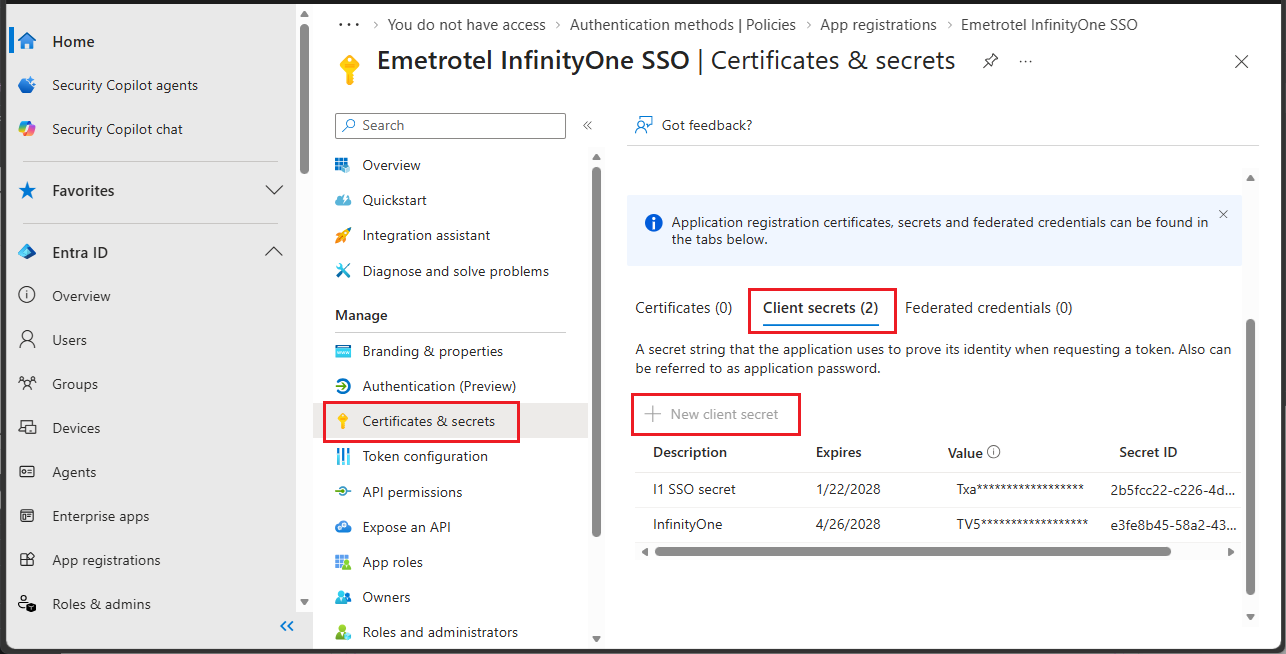
- Under Manage, select Certificates & secrets.
- On the Client secrets tab, click on + New client secret
- Enter a Description.
- Select an appropriate Expiration Period.
- Click Add.
- The Value of the new secret will be displayed.
Copy and save the Client Value immediately. This value will not be displayed again.
STEP 5 – Microsoft SSO Credentials
You now have:
- Client ID from STEP 2
- Client Secret from STEP 4
You can now proceed to configure Microsoft SSO.
Official guide from Microsoft:
https://learn.microsoft.com/en-us/entra/identity-platform/quickstart-register-app
Follow these steps to create the Google credentials required to configure Google SSO.
STEP 1 – Create new project
- Go to the Google Cloud Console and sign in with your Google account.
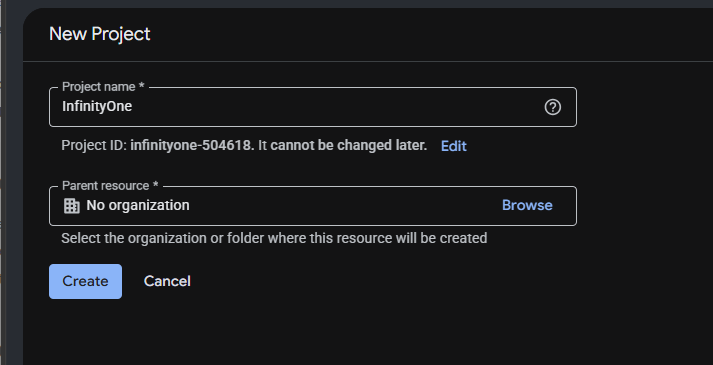
- Click Project Selector at the top.
- Click New Project.
- Enter a Project name.
- Click Create.
STEP 2 – Configure OAuth consent screen
- Select the newly created project.
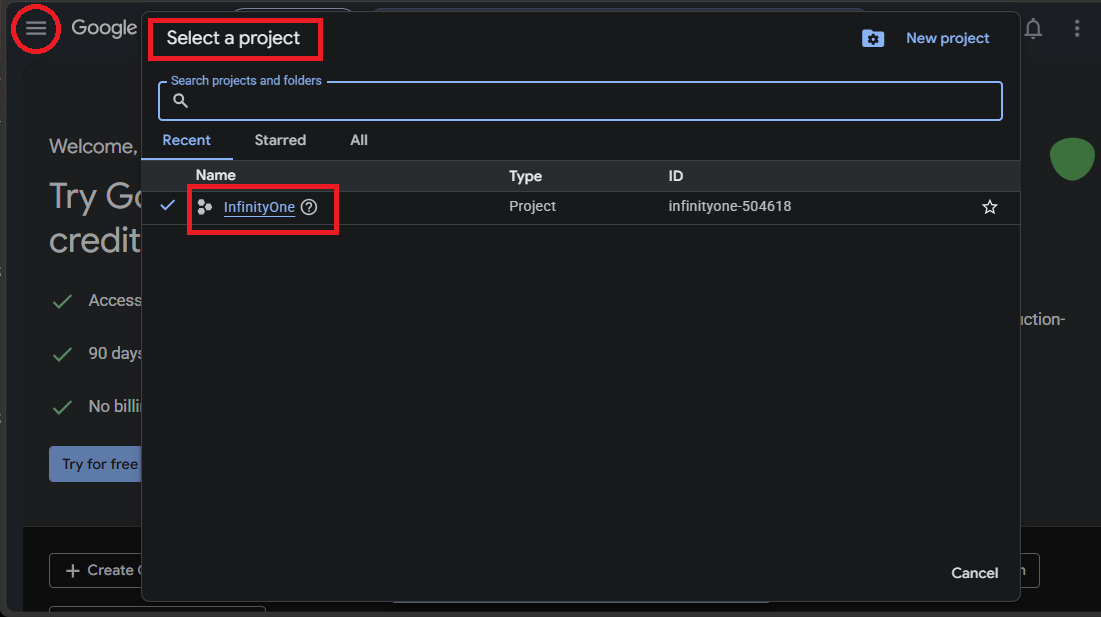
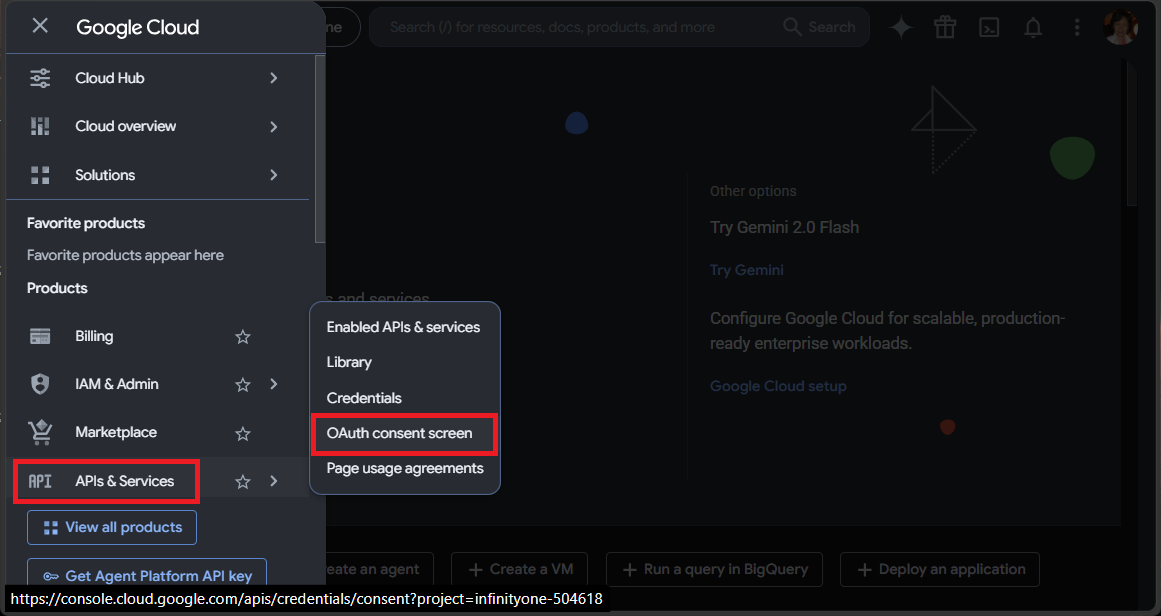
- Click the top left menu icon ☰, navigate to APIs & Services → OAuth consent screen
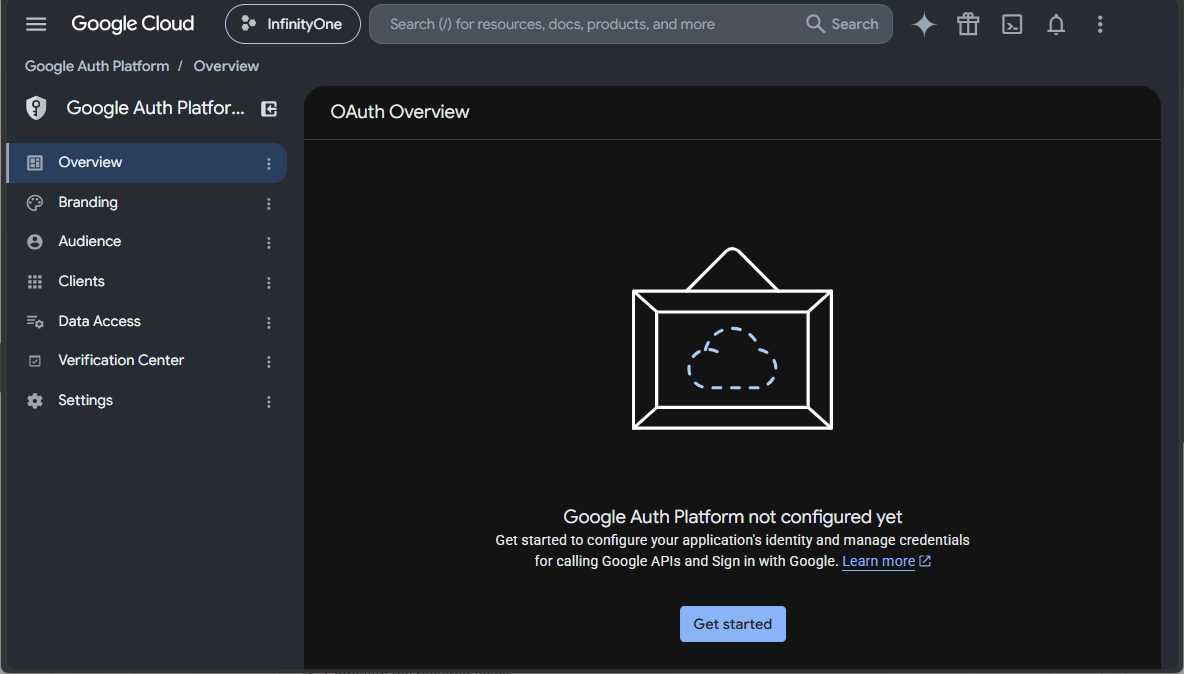
- Start the configuration steps.
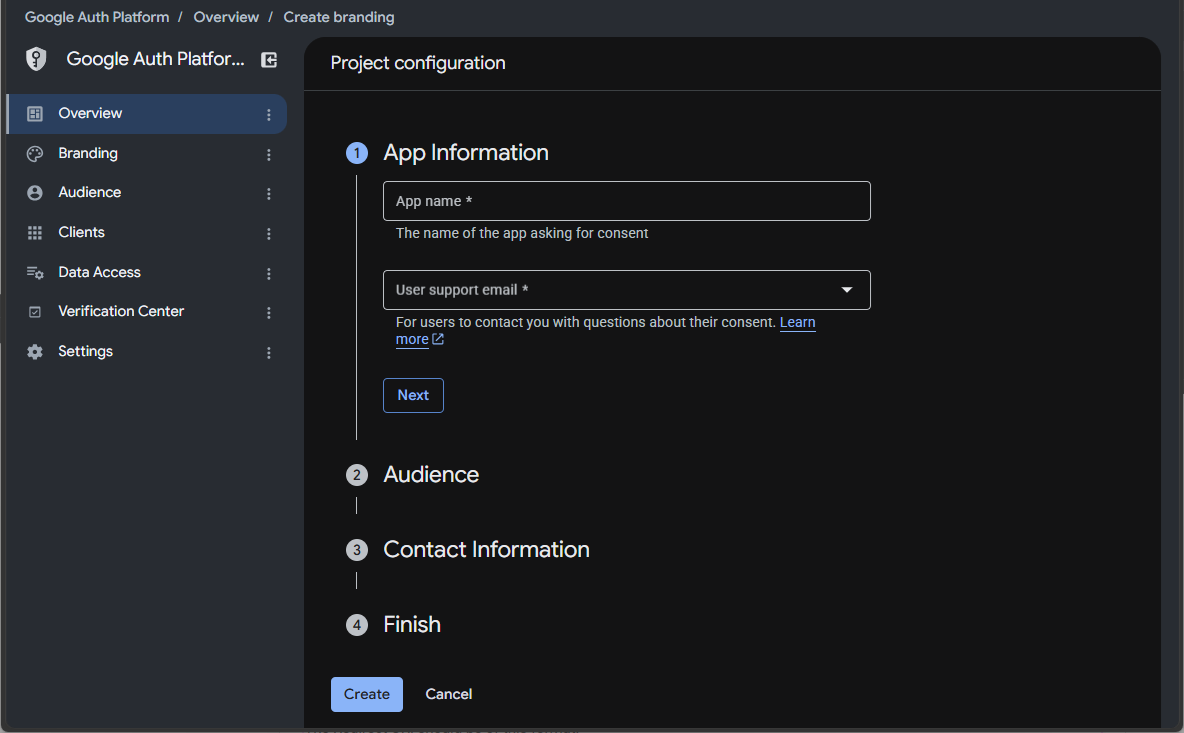
- Complete the required fields and click Create.
STEP 3 – Create OAuth Client ID
The Redirect URI should be of this format:
https://[your_domain]/auth/[provider]/callback
For example, if your domain is test.emetrotel.net:21326, then the redirect URI will be:
https://test.emetrotel.net:21326/auth/google/callback
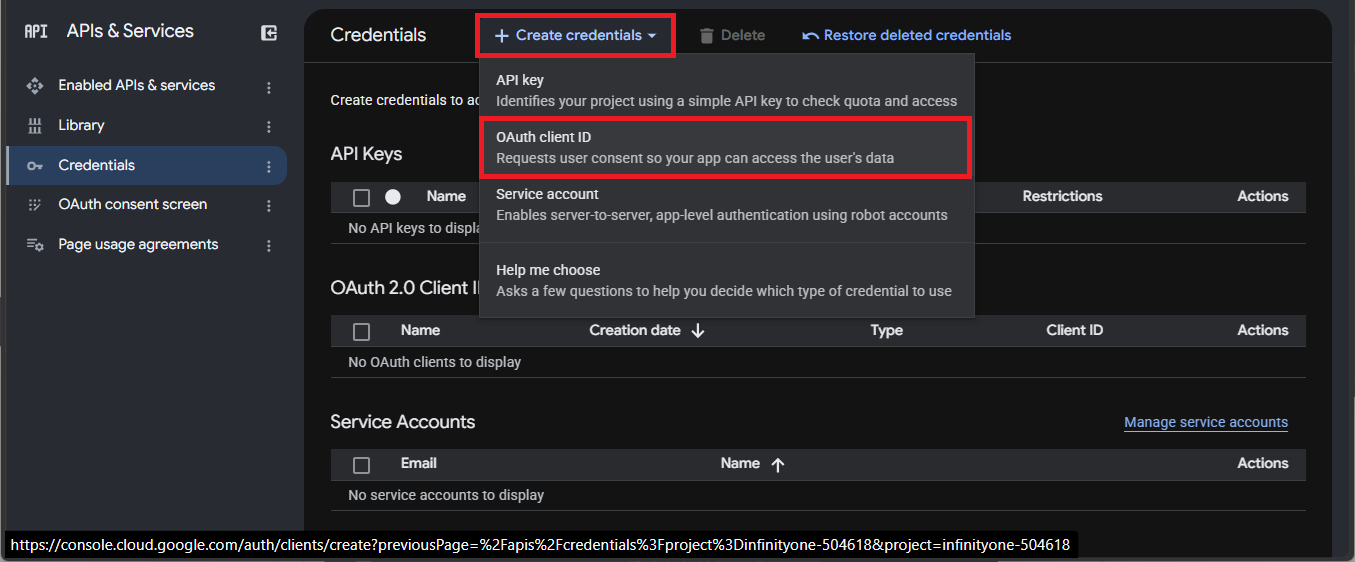
- Click the top left menu icon ☰ , navigate to APIs & Services → Credentials
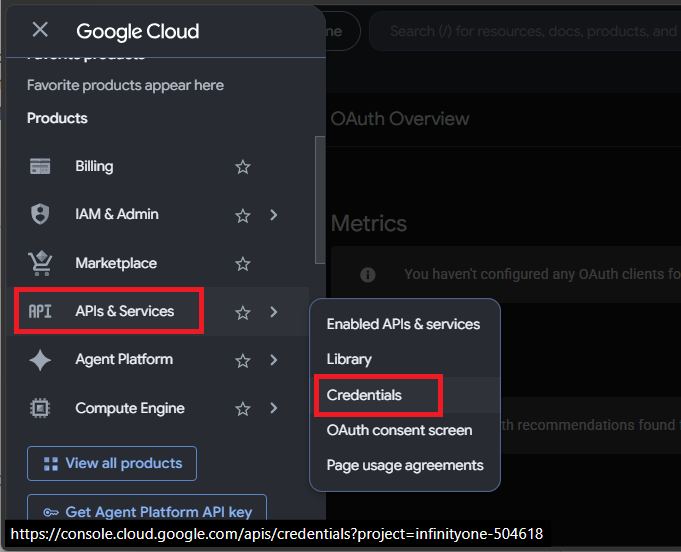
- Click + Create Credentials. and select OAuth client ID.
- For Application type, select Web application.
- Enter a Name.
- Under Authorized redirect URIs, click + Add URI. and enter the Redirect URI.
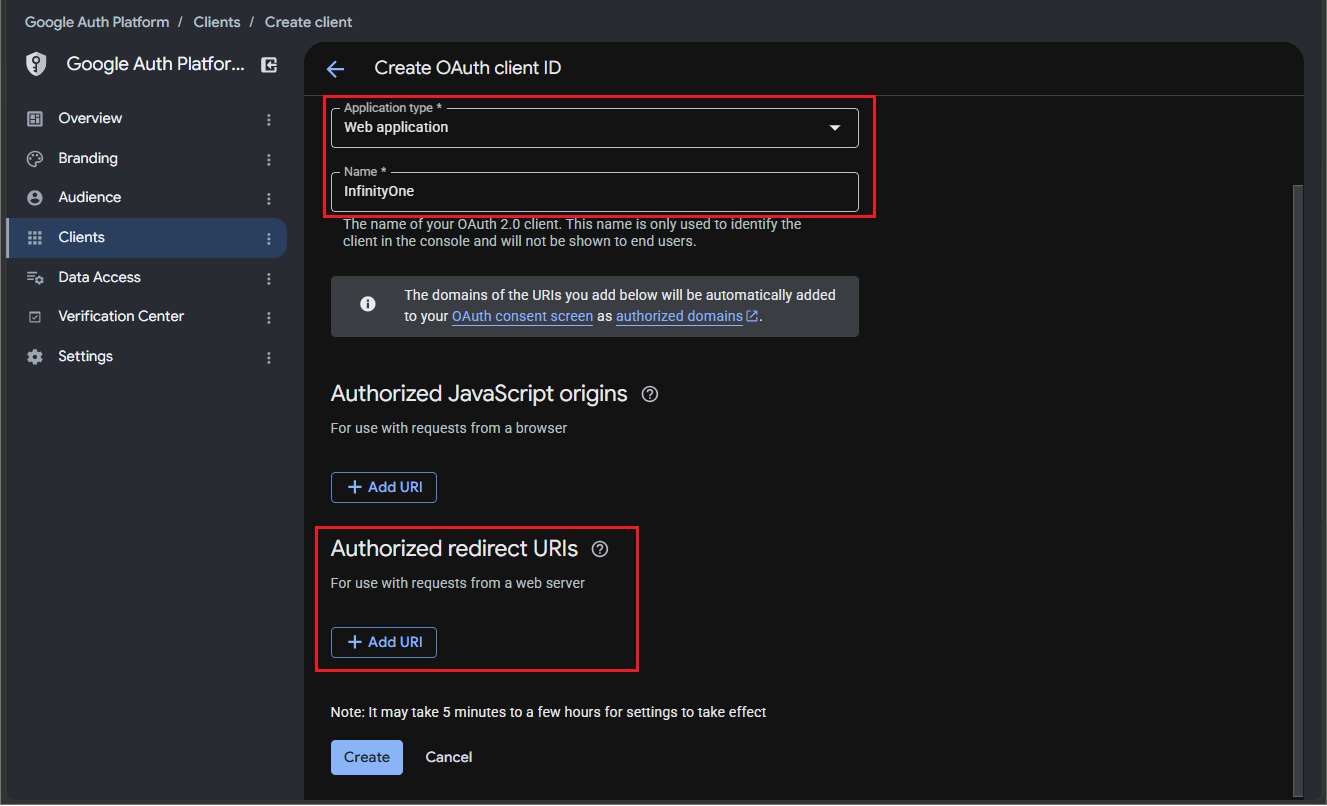
- Click Create.
STEP 4 – Google SSO credentials
Upon initial creation, the credentials will be displayed.
This is the only time the Client secret will be shown. Copy and save the values immediately.
- Client ID
- Client secret
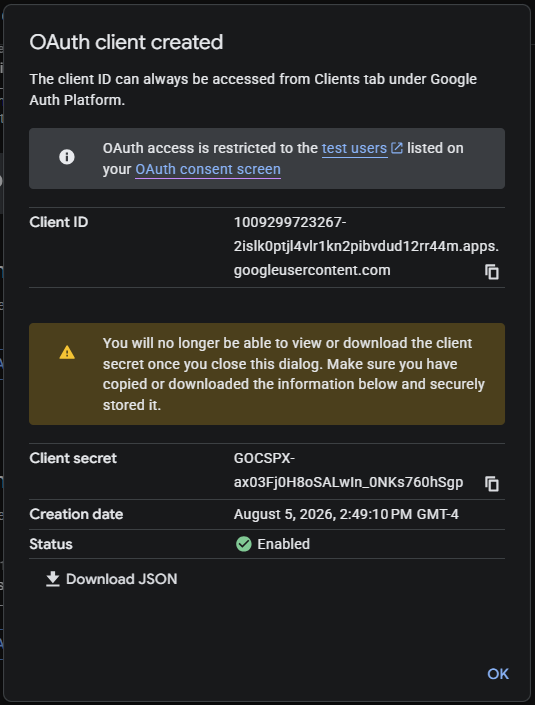
You can now proceed to configure Google SSO.
Official guide from Google:
https://support.google.com/cloud/answer/15549257?utm_source=chatgpt.com&visit_id=639214 593734577746-849373806&rd=1
