Safety Precautions
Working Conditions
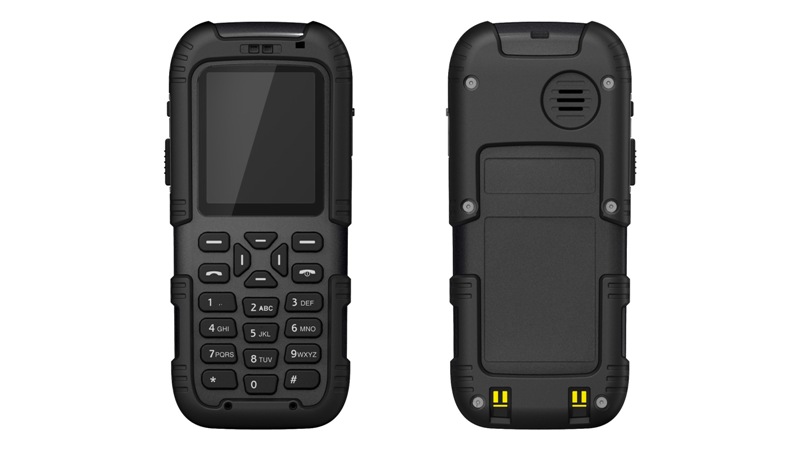
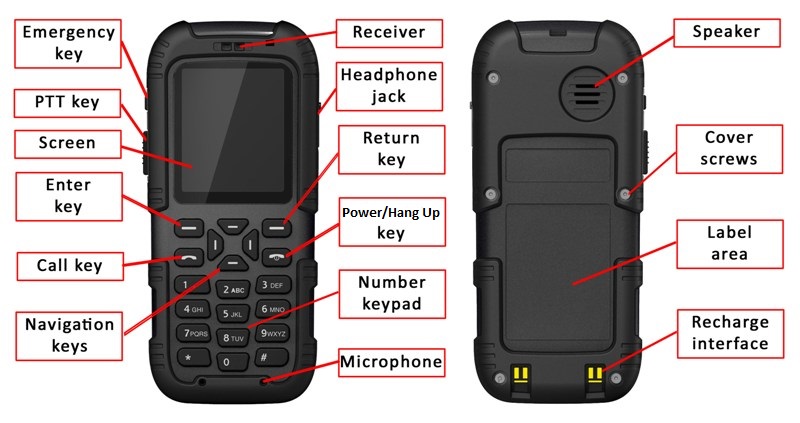
Physical Properties
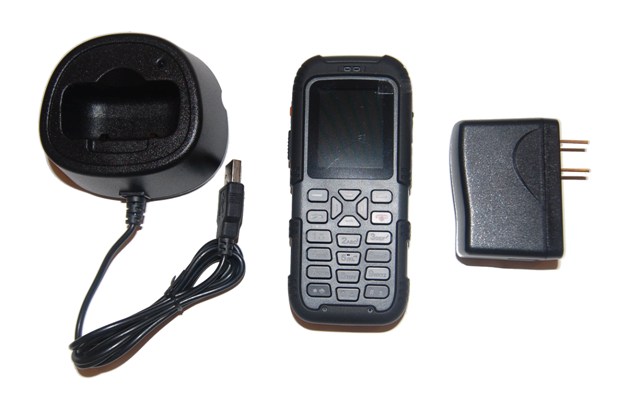
Package Contents
Storage
UC306W WiFi SIP phone is easy to operate and carry. With the proper network coverage (802.11b/g), voice communication and message communication are achieved between cell phones. The phone enjoys a high receiving sensitivity, which guarantees the maximum utilization of wireless network. It is also characterized by low power consumption and long standby time. The phone is operated by a rechargeable Lithium Battery, which can be recharged by the desktop charger supplied
Boot
Press and hold the "Power" key till backlight is on and boot animation will begin. Once start up is complete, the idle screen will be shown.
Idle Screen
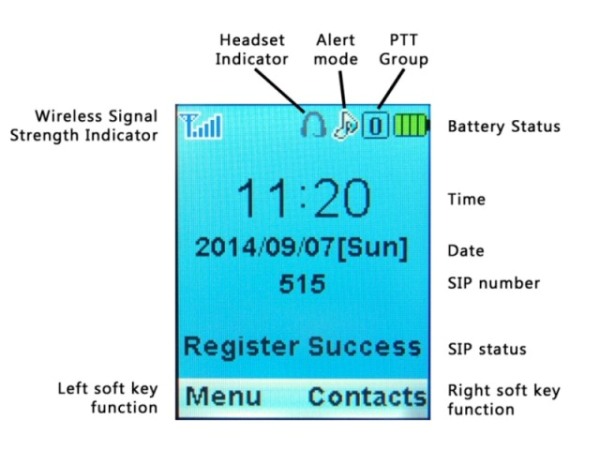
If the phone is already configured with a SIP profile, the UC306W SIP phone will automatically search for a network and register to the SIP server. The registration status and signal intensity will be displayed on the screen. If no authorized network is found, the screen will show an absence of network.
Connecting to Internet
The following steps will search, configure and connect your phone to the WIFI wireless internet:
Connecting to UCx Server
The following steps will configure your phone with a SIP extension already configured on the UCx server:
Reboot
You will need to reboot the phone for Network changes to take effect.
Dialup
Press the numbers you want to dial when the phone is in standby. Press the "Return" key on the right side to delete wrong numbers. Press the "Call" key to make the call.
Receive Call
Phone will ring when there is an incoming call. If the network supports it, the screen will display the caller's name and calling number (depending on whether the relevant information is stored in your phonebook). Press the "Call" key to answer the call.
Reject Call
If you do not want to receive the incoming call, press the "Hang-up" key to reject it.
End Call
Press "Hang Up" key to end the call, or cancel dialing.
Adjust Volume
Adjust the volume via the menu selection (set volume?) , or by pressing the "Navigation" keys during conversation.
Power off
Press and hold the "Power" key under standby mode until the phone is turned off.
Other
To access the main menu, press the left soft key to access the "Menu", then use the up and down navigation keys to access the submenus:
 |
 |
|---|
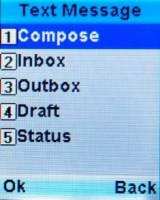
This function allows you to send, receive, forward and edit various written messages. Inbox and outbox can store up to 100 messages. The capacity for draft box is 10 messages.
|
Menu Selection
|
Description
|
|---|---|
| Compose | To create a new message. |
| Inbox | Messages read or unread are stored in inbox. |
| Outbox | Messages successfully sent or failed in sending are stored in outbox. |
| Draft | To access messages not sent. |
| Status | To indicate the storage status of every box, i.e. the number of messages that can be stored and the number that has been stored. |
 |
 |
|---|
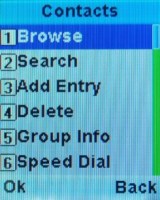
In the phonebook function, you can list all your contacts, save, edit or delete entries. You can also use "groups" to organize the contacts list. The list can store a maximum of 400 entries.
|
Menu Selection
|
Description
|
|---|---|
| Browse |
To browse all the entries in your phonebook. If there is no entry in your list, a dialog box will show on the screen and you will be returned to the Contacts menu. |
| Search |
To search for a contact in your phonebook. In the search interface, you input the first letters of the name and the display will start listing the entries that match. If there is no entry in your list, a dialog box will show on the screen and you will be returned to the Contacts menu. |
| Add Entry |
To add a new contact to your phonebook. The interface will list all the fields for the contact, use the up and down navigation key to select the field to update. |
| Delete |
To delete a contact from your phonebook. You can choose to delete "One by One" or "All" the contacts in the phonebook. |
| Group info |
Group info will list all the groups in your phonebook. Use the up and down navigation key to select the group to view the list of contacts in that group. Use the up and down navigation key to select the contact and press the "Call" key to initiate a call. |
| Speed Dial |
This interface is used to program the speed dial keys. A maximum of 9 phone numbers can be set for speed dial - corresponding to the number keys from 1 to 9. To make a call using speed dial, press and hold the corresponding number key. |
| Memory | Memory will show the storage status of your phonebook. It will list the maximum number of contacts that can be stored, and the number that has been used. |
 |
 |
|---|
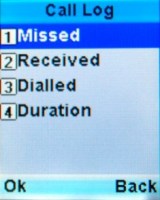
This function allows you to check recent missed calls, received calls, dialed numbers, conversation time and other information. The history log will save a maximum of 20 missed calls, received calls and dialed numbers.
|
Menu Selection
|
Description
|
|---|---|
| Missed calls | To display the numbers of calls recently missed. |
| Received calls | To display the numbers of calls recently received. |
| Dialed numbers | To display the numbers of calls recently dialed. |
| Duration |
You can check the duration of your last call, received and outgoing |
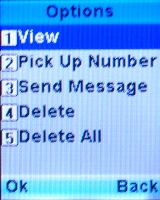
When you select to view the details of a call log, you are provided with several options. If you choose the option to Delete All, you will be prompted to enter a code, enter the code 123456 to proceed with the action.
 |
 |
|---|
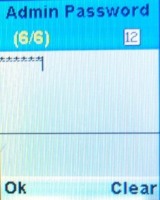
The network menu is mainly used to set WIFI wireless parameters, IP network parameters and VOIP parameters. Please contact your system administrator to obtain the correct network parameters. You need to enter the admin password to access this menu. The default admin password is 080921.
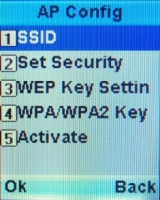
You can set AP (Access provider) parameters from this menu.
|
Parameters
|
Description
|
|---|---|
| SSID | This option is to set the AP's SSID. Input the network name (32 alphanumeric characters maximum), and press the soft key on the left. |
| Set Security |
This option is to set the security parameters of the WIFI wireless network. You can choose from Open System, WEP key, WPA-TKIP, WPA-AES. WPA-Auto or WPA2. If WEP key is chosen, you will need to set the WEP Key. If WPA encryption is chosen, you will need to set the WPA/WPA2 Key. |
| WEP Key setting |
If the security mode of AP config file is WEP key, use this option to set the WEP key. Only 64-bit encryption is supported.
|
| WPA/WPA2 Key Setting |
If the safety mode of WIFI wireless network is WPA/WPA2 PSK, use this option to set WPA/WPA2 key. Input the WPA-PSK value, and press the soft key on the left to confirm. |
| Activate | Not used |
The matrix below specifies which authentication modes are supported:
|
Security Mode
|
Authentication/Cipher Mode
|
Supported
|
|---|---|---|
| Open | n/a | Yes |
| WEP | Open 64-bit | Yes |
| WEP | Open 128-bit | No |
| WEP | Shared Key | No |
| WPA-Personal | TKIP/AES/Auto | Yes |
| WPA2-Personal | TKIP/AES/Auto | Yes |
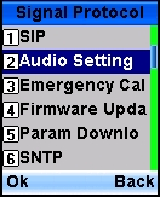
This option is used to set VOIP and other protocols.
This option is used to set the SIP parameters. After entering the data for each field, press the left soft key to save the information.
|
Parameters
|
Description
|
|---|---|
| SIP User Name | Enter the SIP user name (1-32 alphanumeric characters) - this will appear on the idle screen display of your phone |
| SIP Password | Enter the SIP password (0-32 alphanumeric characters) |
| Auth User Name | Enter the Authorization user name. In most cases, the authorization user name is the same as the SIP user name. |
| SIP Register Server Domain Name | Enter the domain name or IP address of the SIP server |
| SIP Register Server Port | Enter the SIP port number. The default is 5060. |
| Use Outbound Proxy | Use this option to enable or disable the SIP outbound proxy. Please contact your server administrator for detailed setting. It is disabled by default. |
| SIP Outbound Server Domain Name | This setting is necessary only when Outbound proxy is enabled. Enter the domain name or IP address of the SIP Outbound server. |
| SIP Outbound Server Port | This setting is necessary only when Outbound proxy is enabled. Enter the Outbound port number. |
| SIP Register Duration | This setting is necessary only when Outbound proxy is enabled. Enter the SIP registration duration. |
|
Parameters
|
Description
|
|---|---|
| Codec Setting | Use this option to select the voice coding: g.711a, g.711mu or g.729. |
| DTMF Mode | Use this option to select the Dual Tone Multi-Frequency mode: RFC2833 or Inband. |
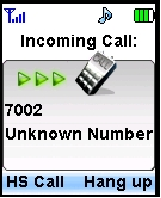
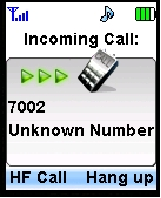
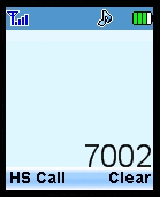
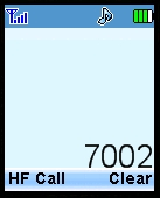
| Auto Hand Free | Use this option to select hands free as the default for incoming and outgoing calls. |
The following screen captures show the screen displays when Auto Hand Free is enabled versus disabled.
|
Call Type
|
Auto Hand Free Enabled
|
Auto Hand Free Disabled
|
|---|---|---|
| Incoming |
 |
 |
| Outgoing |
 |
 |
This feature is not in use.
Please see Firmware Update on UC306W phone.
This feature is not in use.
To set parameters related to Internet time.
|
Parameters
|
Description
|
|---|---|
| NTP Mode | Use this option to enable of disable NTP |
| NTP Server | Enter the IP address of the NTP Server |
| Update Now | Select this option to execute the update |
To enable and configure mobile assisted positioning parameters. When this feature is enabled, the phone saves the currently connected AP's MAC address and signal strength as well as its own MAC address, this information is sent to the tracker server to use.
|
Parameters
|
Description
|
|---|---|
| Tracker Mode | Use this option to enable or disable Tracker function |
| Tracker Server | Enter the IP address of Tracker Server |
| Tracker Server Port | Enter the port number of Tracker Server |
| Time Period | Enter the frequency of transmission |
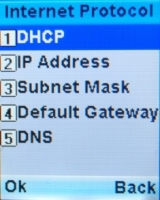
This option is to set the IP network parameters.
|
Parameters
|
Description
|
|---|---|
|
DHCP |
If DHCP is enabled, DHCP server will assign an IP address to the phone. Use this option to enable or disable DHCP. |
| IP Address | Enter the IP address of your phone. |
| Subnet Mask | Enter the subnet mask. |
| Default Gateway | Enter the IP address of the default gateway. |
| DNS - Primary DNS Server IP Address | Enter the IP address of the primary DNS server |
| DNS - Secondary DNS Server IP Address | Enter the IP address of the secondary DNS server |
|
Menu Selection
|
Description
|
|---|---|
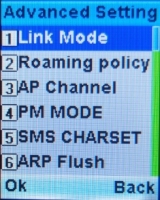
| Link mode | Users may set the connection mode to be automatic connection, or via 802.11b or 802.11g protocol. |
| Roaming policy |
Set the AP channel search mode. There are 3 options:
|
| AP Channel |
This option is used to set the channel of wireless network. The default channels are: 1, 6 and 11. |
| PM Mode | Select PM mode: PS-POLL or PS-PMBIT |
| SMS CHARSET | Select SMS character set: UTF8 or GB2312 |
| ARP Flush | Enable or disable ARP Flush |
| Password Protect |
Enable or disable password protect. The default setting is enabled. When disabled, you can access all the menus without being prompted for the Admin password. |
| Password Set | This is to set the Admin password. |
| Restore Factory Config | The option is used to restore the phone to factory settings. |
| Roam Parameter | Configure roaming parameters: Switch Threshold and Scan Interval |
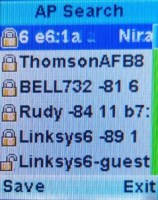
This function will search for available networks, list the AP information, and save the selected AP configuration. The "Save" operation redirects to the AP Config menu and autofills the parameters with information from the selected AP (see section 4.4.1).
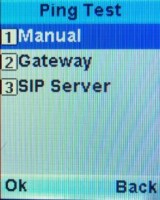
Use the Ping function to test connectivity of your network.
 |
 |
|---|
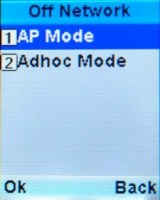
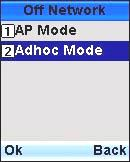
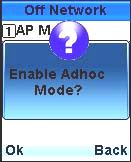
Set the communication mode, choose between AP and Ad-hoc communication modes. The phone will reboot automatically each time you switch between the two modes.
If you have network connectivity, then you want to set your communication to AP mode. In AP mode, the phone will connect to the saved AP profile (section 4.4.1).
 |
 |
|---|
If the communication mode is set to Adhoc, then the phone is off the network and can only communicate with other UC306W phones within a limited area. PTT function is also available.
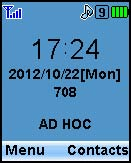
The idle screen in Adhoc mode will display the SIP number. If the SIP number has not been configured previously, the phone will generate a number automatically. The example below shows the number "708".
To change the SIP number, perform the following steps:
 |
 |
|---|
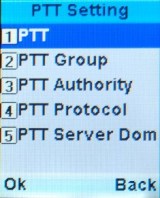
Enable, categorize or set operational mode of Push-To-Talk (PTT).
|
Parameters
|
Description
|
|---|---|
| PTT | Enable or disable the PTT function |
| PTT Group | Configure the PTT group number. Up to 4 groups are supported: 0 to 3. |
| PTT Authority |
Select the user type: Normal User or Super User Normal User: Can receive and initiate calls to users in the same group Super User: Can receive calls from users in the same group, can initiate calls to users in all groups |
| PTT Protocol |
Select the protocol: Multicast, Broadcast or Unicast. Multicast: Transmit intercom via the Multicast protocol (239.0.0.1) Broadcast: Transmit broadcast via the Broadcast protocol (255.255.255.255) Unicast: Transmit to Intercom Server (PTT Server Domain field is required) |
| PTT Server Domain | Enter the Intercom Server domain name or IP address. This is required when using Unicast protocol. |
The phone must first be connected to WIFI, then the PTT function is ready for use. The PTT key is located on the side of the phone.

To initiate transmission, press and hold the PTT key until you hear a beep sound, transmission will continue as long as you hold the PTT key.
To end the transmission, release the PTT key and you will hear 2 short beeps. Now your phone is in receiving status.
 |
 |
|---|
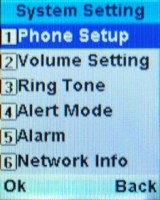
Various settings for the phone is configured from this menu.
|
Menu Selection
|
Description
|
|---|---|
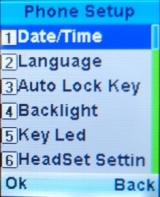
| Date/Time | Use this option to set the current time and date, you can also select the time and date formats. |
| Language | Set phone language to be Simplified Chinese or English. |
| Auto Lock Key | When this function is enabled, the phone will lock its keypad automatically. To unlock the keypad, press and hold the # key. |
| Backlight |
Set the time period during which backlight is on. |
| Key Led | Enable or disable key light. |
| HeadSet Setting | Enable or disable headphone. |
| Version | Check software version, resource version and product information. |
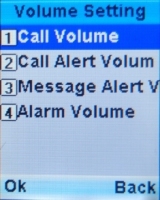
To set the volume of phone calls, incoming calls, incoming messages and alarm clock.
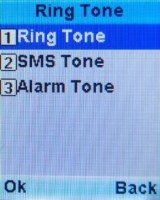
To set the ringtone of incoming calls, SMS alert and alarm.
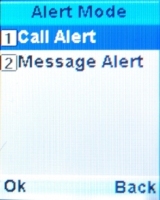
To set the ringing type of incoming calls and messages.
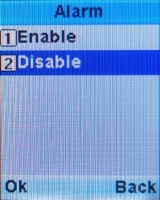
To set the alarm functions.
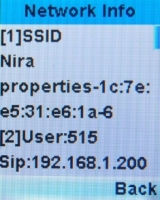
To display network name, IP address, subnet mask, gateway IP address, DNS address, MAC address, etc.
Question: Why can't the phone be re-booted?
Please check the battery. For example, connect the phone to charger and check whether the charging is normal. Then re-boot.
Question: Why can't I make phone calls?
Question: Why is there no network signal?
Question: Why is the phone unable to roam?
The roaming function of UC306W is limited to APs with the same SSID. If you roam to an AP coverage area with a different SSID, you have to reset the user name and password of SSID.
Question: How to improve the roaming effect of the UC306W phone?
The UC306W supports automatic roaming. To optimize and improve the roaming effect, consider the following measures in your planning:
Question: How to improve voice quality?
The UC306W supports "Push to Talk". To optimize and improve voice quality, consider the following measures in your planning: